Top knitting Tips and Tricks
The best tips and tricks in knitting, explained step by step. Great advice for beginners and experts.
-
How to Be a More Productive Knitter: 10 Great Tips
In this post, I’m sharing 10 great tips to help you be a more productive knitter. Why? To me, September is like a new start, the beginning of my favorite time of the year. The long hot days of Summer are the perfect time to get organized, plan, and set systems and goals for the Autumn (or Fall in America). I know that many of you knit just for fun, but some, knit for charity, gifts, or presents for your loved ones, and for others, it’s an important source of income. In today’s tutorial, I’m going to give you my best tips to, get organized, and be a more productive…
-
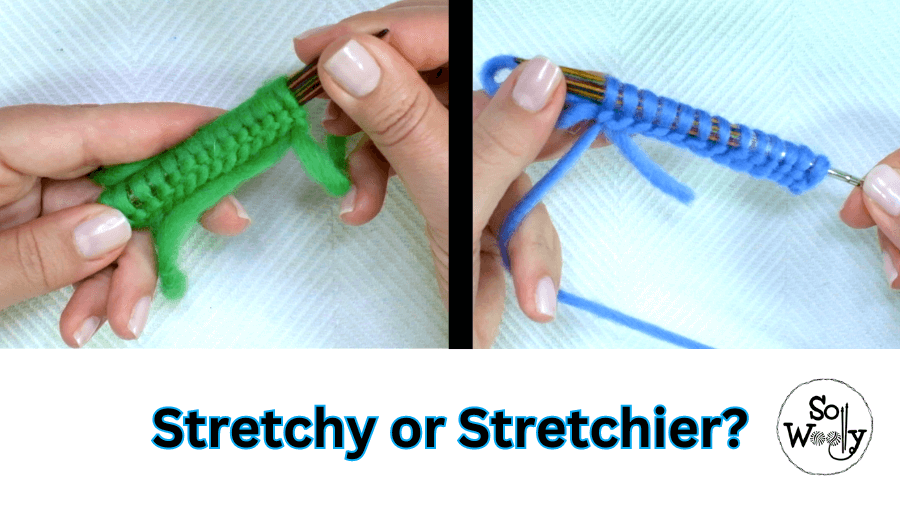
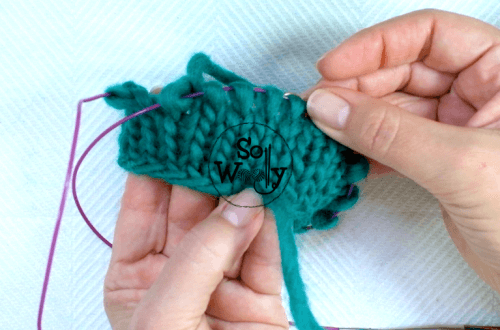
How to do the German Twisted Cast-On + the Long Tail
Today, I’m sharing two ways to cast-on stitches in knitting: The German Twisted and the Long Tail. When I was a little girl, I learned the Long Tail method, and it’s been my favorite since then. It’s stretchy, it looks pretty on both sides, and it works for any sort of project; and I do it every time without thinking. But I always heard that the German Twisted cast-on was better for socks, leg warmers, gloves or mittens, and hats. Why? Well, it’s even stretchier, so you’ll never have a cuff that doesn’t fit. However, when I tried to do it, I couldn’t get my head around it. At first…
-
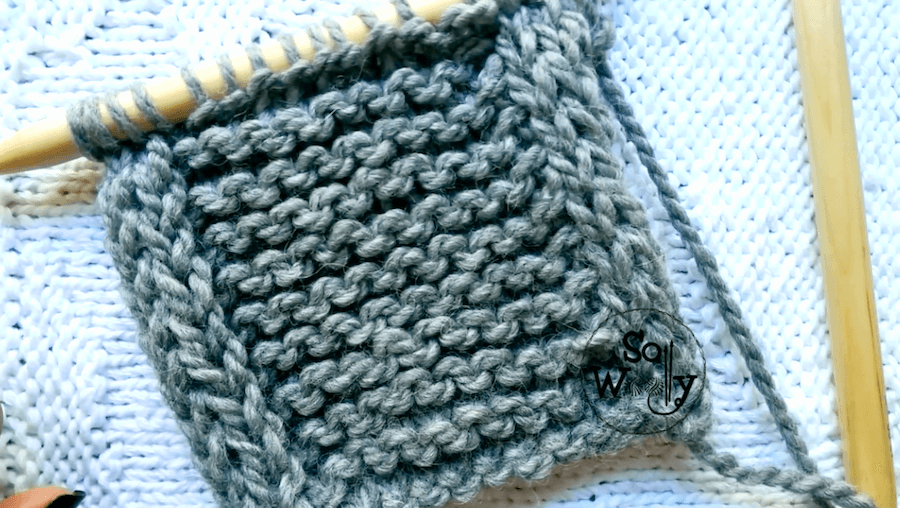
How to Knit in the Round: The Magic Loop Revisited
In my last tutorial, I shared how to knit in the round, and today, I’m revisiting the Magic Loop technique. We learned how to cast on, the Stockinette stitch, and how to bind off without a jog. However, I made a mistake when showing the Magic Loop… I learned it the “inside out way”, and over the years, I knitted dozens of projects, and never realized it! After the first 2-3 rounds, I turned the sock (or the hat inside out), because I was facing the wrong side of the work, to be facing the right side. I was so used to it, that I never thought about it. So,…
-
How to Knit in the Round for Absolute Beginners
Today, I’m sharing the basics of how to knit in the round, using circular needles; a step-by-step introduction, for absolute beginners. It’s a magic technique: You can create seamless accessories such as cowls, socks, hats, mittens, and gloves. Imagine a world where we knitters don’t have to seam anything? Yay! Well, let me tell you: It’s possible when knitting in the round! (Both, with circular or double-pointed needles). For example, you can knit a top-down sweater or cardigan, in one piece: Starting from the top (the neckline), down to the sleeves, and then the body, finishing with the hem. Moreover, this is not the only advantage when knitting in the…
-
How to do the Increases-Decreases in the Fisherman’s Rib stitch
In this tutorial, I’m sharing how to do the double increases and decreases when knitting the Fisherman’s Rib stitch. Previously, I showed you how to knit the classic version, without purling, in the round, and how to fix mistakes (you’ll find the links to all those tutorials down below). And the truth is that since then, many of you asked me how to shape a project while keeping the pattern, that is to say without breaking it. Fortunately, a couple of days ago I remembered that it was still on my list of pending, so there you go! Before we start, I’d like to mention a couple of simple rules,…
-
How to do The I-Cord Bind-Off (Knitting Technique)
In this post, you’ll learn how to do the i-cord bind-off (or cast-off, whatever you prefer). Honestly, I love the gorgeous round and firm edge that it creates… In fact, in previous tutorials, we have practiced many ways to use it: Firstly, I showed you how to knit an i-cord edge for the sides of your projects. Secondly, we learned how to knit an i-cord (like a little tube made out of three stitches). Thirdly, I shared how to do the i-cord cast-on. I think it’s a pretty way to start and finish a blanket, for example, but it’s also perfect for the neckline of a sweater 😉 So, grab…
-
How to Knit an I-Cord and The I-Cord Cast-On Method
In this post, I’m sharing how to knit an i-cord, and how to use it to do the i-cord cast-on method. Actually, in a previous tutorial, I shared how to knit an I-Cord Edge as you go, for the sides of a garment. The i-cord is a tube made out of three stitches, which can be used to make ties for booties, and hats, or for example to make the handles of a bag. In addition, an i-cord can be used to make the stems or stalks of a pumpkin or pumpkin hat. Besides, you can use it to make the cast-on edge, to create a pretty, steady, and round…
-
How to knit an I-Cord Edge 3 ways!
Today, you’ll learn how to knit an i-cord (not an Apple product… yet ; ) edge 3 ways… It’s a super easy yet useful technique, which will give a special finish to our projects. The good news is that an i-cord edge has different uses: Firstly, it’s especially helpful, when knitting a piece in Stockinette stitch, to prevent it from curling (in the video tutorial I’m showing how to do it for both, at the beginning and at the end of a row). Secondly, it’s perfect for the front pieces of a cardigan; it will give more firmness to the button band. Thirdly, the i-cord edge is also suitable when…
-
How to knit the most beautiful chained edges
In today’s post, I’m sharing how to knit chained edges (identical on both sides). Honestly, I have to make a confession… I’m in love (yet again) with the shape of chains in knitting (this is why I shared how to knit the chained cast-on a few months ago 😉 It’s a pretty simple technique that creates the most beautiful edges, perfect for scarves, blankets, cowls, and headbands, for example. Actually, it can be applied to any knitting project that stays flat, and you can use any pattern, not only the Garter stitch… Nevertheless, if you are working with a different pattern, please note that the second stitch needs to be…
-
How to knit a Picot Edge – Beautiful Knitting Technique
Today, I’m sharing how to knit a beautiful Picot Edge, step by step. It’s a great knitting technique, quick and fun to do; the truth is that when I saw it, I fell in love again 😉 The only techniques required are simple: Knit stitch, purl stitch, yarn over, and knit two stitches together. Honestly, it will give a touch of elegance to your projects; and it’s pretty versatile: You can use it for the edge of sweaters and cardigans, but also for blankets and ponchos. In fact, it will also work for the cuff of the sleeves. I believe that these kinds of details can make a difference, by…