Symmetry in the Chevron stitch/3 needle bind off (no seaming)
Several months ago, we practiced the Reversible Chevron stitch, and in this tutorial, I’m sharing three new things:
On one hand, you’ll learn how to knit the Ribbed Chevron stitch, ideal for scarves, blankets, and rectangular shawls or wraps (both sides look almost identical, and it stays flat! Yay!).
On the other hand, you’ll see what to do to make both extremes of the garment look the same when knitting a stitch that creates picks (or a pointy edge). In other words, how to get symmetry in your Chevron stitches… yeap, it’s possible!
Last, but not least, you’ll learn how to bind off and seam two knitted pieces at the same time, without seaming. This technique is called “3 needles bind off”.
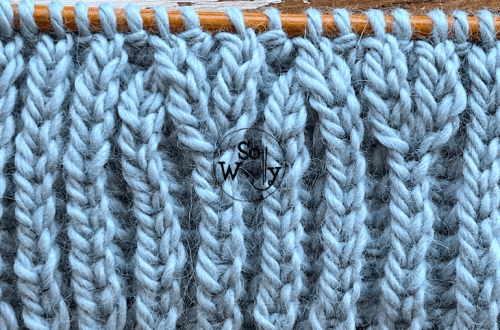
Before we start I’d like you to know that the Ribbed Chevron stitch forms an embossed arrow pattern, practically identical on both sides.
You’ll be delighted to hear that due to the frequent combination of knits and purls, the fabric stays flat… I know, I know, form an orderly queue please 😉
However, please note that when you start knitting this stitch, you’ll see sharp picks at the bottom edge (which is totally normal due to the double central decrease).
Interestingly enough, when we finish and bind off, the other extreme (the upper edge) stays completely straight. There will be no picks. We’ll end up with two different edges.
So, what to do to make both extremes of the scarf/blanket look exactly the same?
No, we do not reach for the scissors!
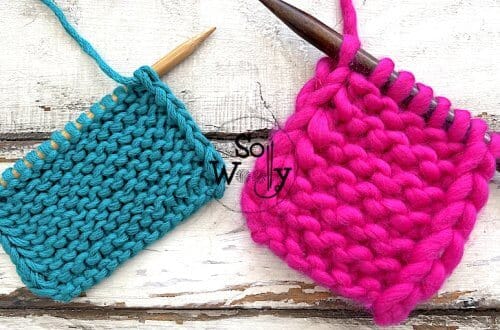
If you want that both edges show the picks, then knit two separate pieces, and join them together later on.
For example: When knitting a scarf, split the length in two, and knit two pieces that have the same measurement (let’s say 31 in / 80 cm each). And don’t bind off; leave the stitches “live” in each part.
To join them, try the Grafting technique that we’ve done for the Spiral Hat (sewing up both sides using a tapestry or darning needle).
However, you can also use another technique (I explain it in the video tutorial), which consists of using a third needle of the same size, to connect them knitting, not sewing.
This way both extremes of the piece will look identical, and there will be a slight division in the middle.
Ok, it’s time to grab needles + yarn and let’s knit together 😉
Abbreviations
CO: Cast on
RS: Right side of the work
K: Knit
P: Purl
m1R: “Make one right” or Right-leaning increase (take the bar between two stitches with the right-hand needle. Place it onto the left-hand needle from front to back, and knit that stitch through the back loop). We have created one new stitch.
cd: central decrease (slip 2 stitches knitwise at once, knit the next, and pass the slipped stitches over the last one).
P3tog: Purl three stitches together
BO: Bind off
How to knit the Ribbed Chevron stitch
CO multiples of 20 + 1; i.e.: 20 * 2 = 40 + 1 = 41 st.
1º row (RS): *K1, m1R, [K2, P2] twice, cd, [P2, K2] twice, m1R*. Repeat from * to *, ending with K1.
2º and every even row: Work each st as it presents (knit the knits; purl the purls).
3º row: *K1, m1R, P1, K2, P2, K2, P1, p3tog, P1, K2, P2, K2, P1, m1R*. Repeat from * to *, ending with K1.
5º row: *K1, m1R, [P2, K2] twice, p3tog, [K2, P2] twice, m1R*. Repeat from * to *, ending with K1.
7º row: *K1, m1R, K1, P2, K2, P2, K1, cd, K1, P2, K2, P2, K1, m1R*. Repeat from * to *, ending with K1.
8º row: As per 2º row.
These 8 rows create the pattern. Repeat them until the desired length is reached. When finished, BO working each stitch as it presents, after a row 7 (this way the upper extreme will show straight).
On the contrary, if you want to get symmetry, do not bind off, and knit a second piece of the same length. To join them, please watch the video tutorial 😉
This is the wrong side of the work:
Finally, click here to watch the video tutorial
I hope you love it and don’t be afraid to share, if you think one of your friends might like this pattern?
A big hug and happy knitting!
xoxo
Carolina – So Woolly
PS: If you like the way the fabric ends in point please have a look at the links below for another adorable lace pattern with interesting edges:
Horseshoe Lace knitting pattern
“As an Amazon Associate I earn from qualifying purchases.”