How to knit the Checkered Rib stitch pattern
In this post you’ll learn how to knit the Checkered Rib stitch; a lovely knit and purl pattern.
It reminds me of the Tweed stitch with knits and purls only that we practiced sometime ago.
Actually it has the look of tartan fabric in a single color, and it will work with both, wool or cotton yarn (or their blends).
Although both sides look a little bit different, they are practically the same (very pretty indeed) so to me, this is a reversible stitch.
Honestly, I like the “wrong side” more 😉
In addition, the Checkered Rib is a four-row repeat pattern, easy to do, and easy to memorize (there are no decreases or increases).
Furthermore, it lays flat! It won’t curl or bend no matter what you do, so it’s totally beginner-friendly.
So it’s a nice option for a wide range of projects: From blankets to hats, passing through scarves, cowls, and sweaters or cardigans… you decide!
Ok, enough chatting, it’s knitting time!
Grab your needles, and some yarn, and let’s get started.
Abbreviations
CO: Cast on
RS: Right side of the work
st: Stitch
K: Knit
P: Purl
BO: Bind off

Using one of my favorite bamboo dpn needles US 7 / 4.5 mm #ad
N.B.:
The odd rows form the right side of the work.
The first and the last are edge (selvage) stitches, and will be knitted on odd rows, and purled on even rows.
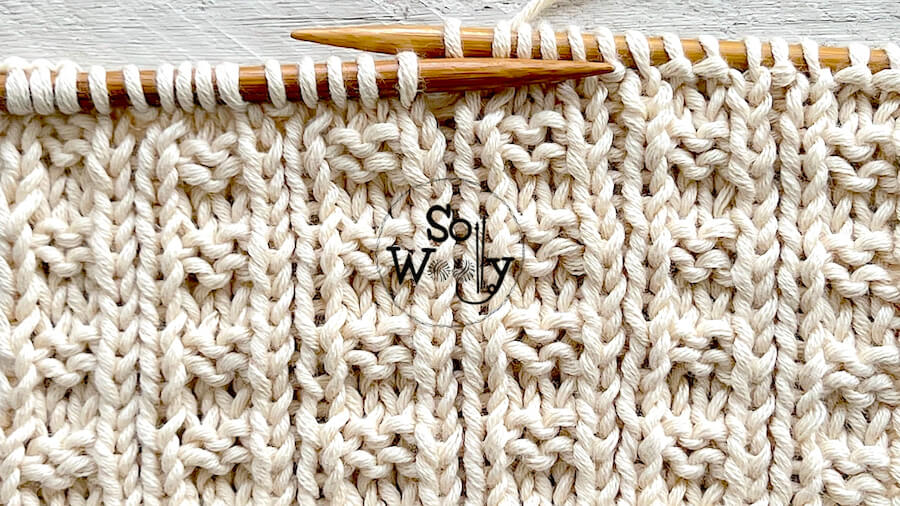
How to knit the Checkered Rib stitch
CO multiples of 5 + 4 + 2 (edge st); i.e.: 5 * 2 = 10 + 4 = 14 + 2 = 16 st.
1º row (RS): K1 (edge), *K1, P2, K1, P1*. Repeat from * to *, to last 4 st, ending the row with K1, P2, K1 (edge)
2º row: P1 (edge), P1, K2, P1, *K1, P1, K2, P1*. Repeat from * to *, to last st, P1 (edge)
3º row: K1 (edge), *K4, P1*. Repeat from * to *, to last 5 st, ending the row with K4, K1 (edge)
4º row: P1 (edge), P4, *K1, P4*. Repeat from * to *, to last st, P1 (edge).
These four rows create the pattern. Repeat them until the desired length is reached.
When finished, BO working each stitch as it presents, after row 3 (WS).
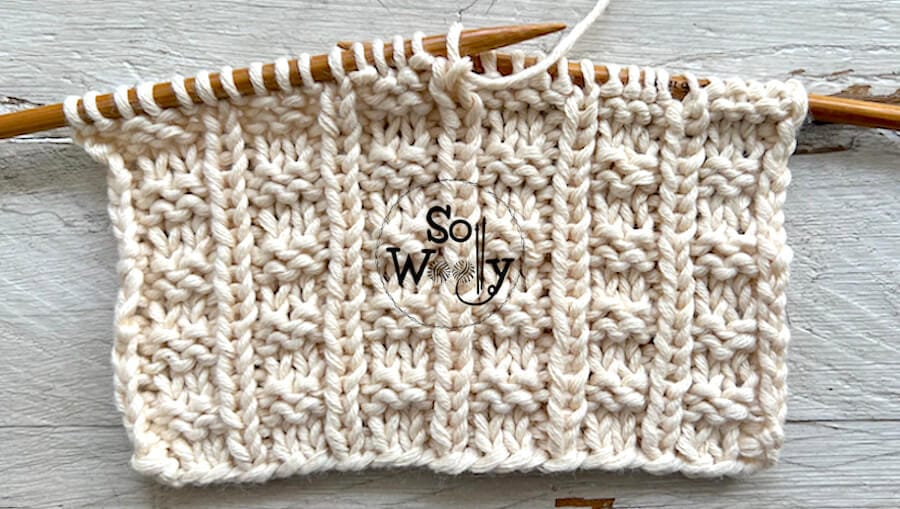
This is the wrong side of the work:
Enjoy the video tutorial:
The Checkered Rib stitch pattern
I hope you like it 😉
Hugs and happy knitting!
xoxo
Carolina – So Woolly
“As an Amazon Associate, I earn income from qualifying purchases that meet the applicable requirements.”