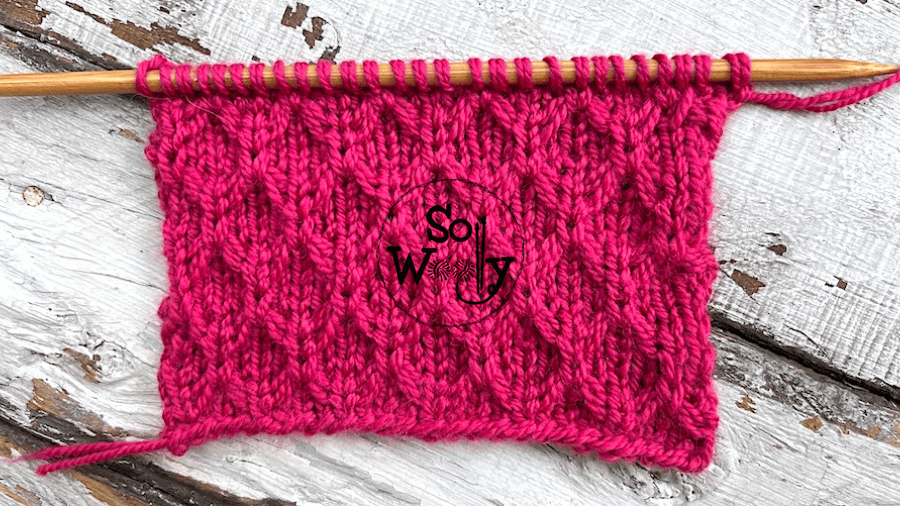
How to Knit Pretty Quilted Diamonds (A 3D Pattern)
In this tutorial, you’ll learn how to knit quilted diamonds, another eye-catching pattern 🙂
It’s pretty similar, yet easier than the 3D Honeycomb we practiced a while ago.
The Quilted Diamonds is a versatile stitch; it’s a nice option not only for accessories but also for big projects (sweaters, cardigans, blankets, etc.).
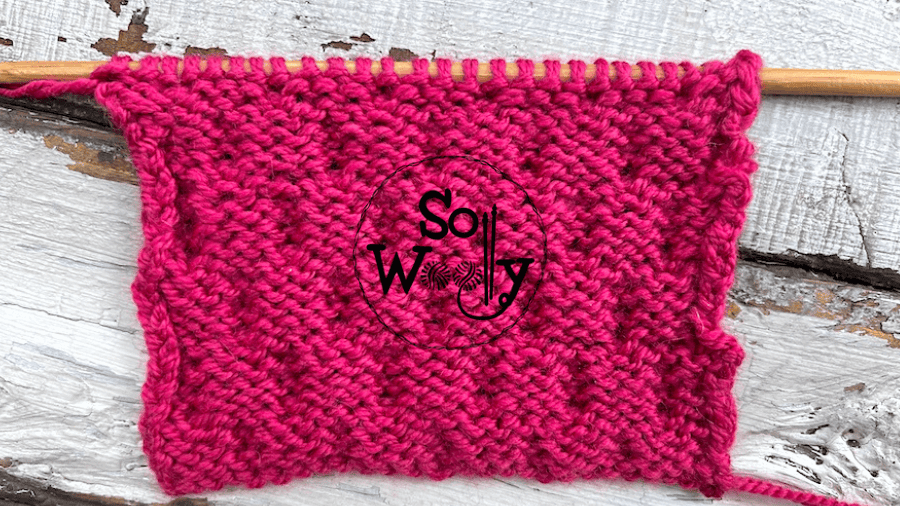
However, if you choose to knit a garment that should stay flat, such as a scarf, or an infinite cowl, think of adding a nice edge on each side of the piece.
Why?
Because it tends to curl at the bottom, and the sides look a bit irregular.
So, if we add some rows at the beginning and the end, and some stitches before and after the pattern on each row (in a nice knit and purl pattern), that issue will disappear.
Would you like some examples? Take a look at the end of this post 😉
And before I forget, I’d like to suggest you to use pointy needles #ad
The truth is that the sharp tip needles will help you to take the bars that create the diamonds, among many other tasks 😉
So, my little Woolly, grab your needles and some yarn, and let’s knit together!
“As an Amazon Associate, I earn from qualifying purchases.”
Abbreviations
CO: Cast on
st: Stitch
RS: Right side
K: Knit
P: Purl
wyif: With yarn in front
sl3pw: Slip three stitches purlwise (pass three stitches, one by one, onto the right-hand needle as if to purl)
K1w2s: Knit one with two strands (place the right-hand needle underneath the 2 strands from previous rows, knit the next stitch from the left-hand needle, and pull the yarn through the 2 strands).
WS: Wrong side
BO: Bind off
N.B:
We’ll start with a setup row, which will be made at the beginning and doesn’t form part of the pattern.
The odd rows form the right side of the work.
The edge (selvage) stitches (the first and the last) will be knitted on every odd row, and purled on every even row.
How to Knit the Quilted Diamonds stitch
CO multiples of 4 + 2 (edge st); i.e.: 4 * 4 = 16 + 2 = 18 st.
Setup row: P across
Rows 1 and 3 (RS): K1 (edge), *wyif sl3pw, K1*. Repeat from * to *, to last st, K1 (edge)
Row 2 (and every even row: P across
Row 5: K1 (edge), *K1, K1w2s, K2*. Repeat from * to *, to last st, K1 (edge)
Rows 7 and 9: K1 (edge), K2, *wyif sl3pw, K1*. Repeat from * to *, to last 3 st, wyif sl2pw, K1 (edge)
Row 11: K1 (edge), K2, *K1, K1w2s, K2*. Repeat from * to *, to last 3 st, end with K1, K1w2s, K1, K1 (edge)
Row 12: P across
These twelve rows create the pattern. Repeat them until the desired length is reached.
When finished, BO purlwise after row 11 (WS).
This is the other side of the work:
Enjoy the video tutorial:
How to knit Pretty Quilted Diamonds
Thank you for watching!
Hugs, and happy knitting 🙂
Carolina – So Woolly
PS: This is a nice stitch pattern for edges