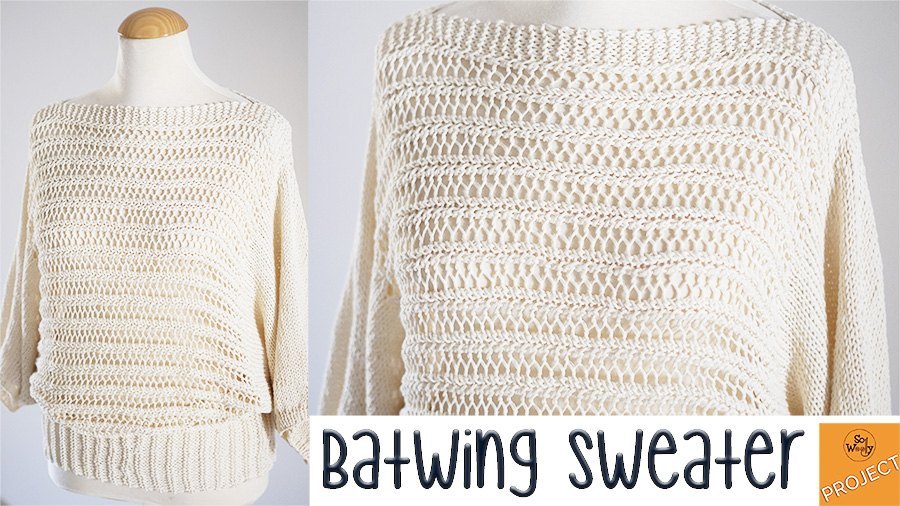
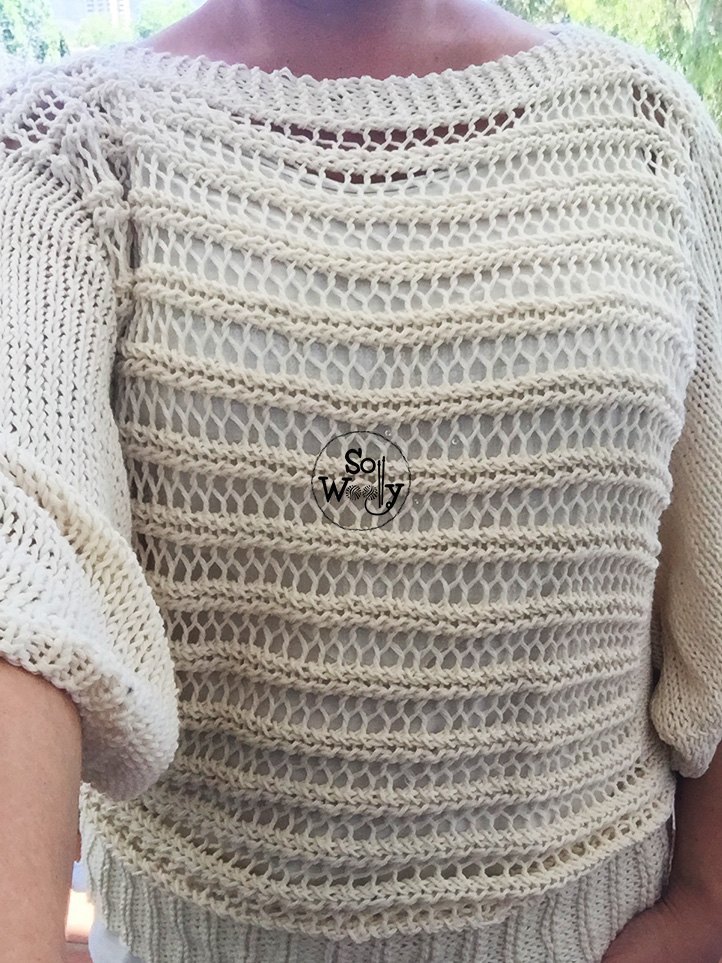
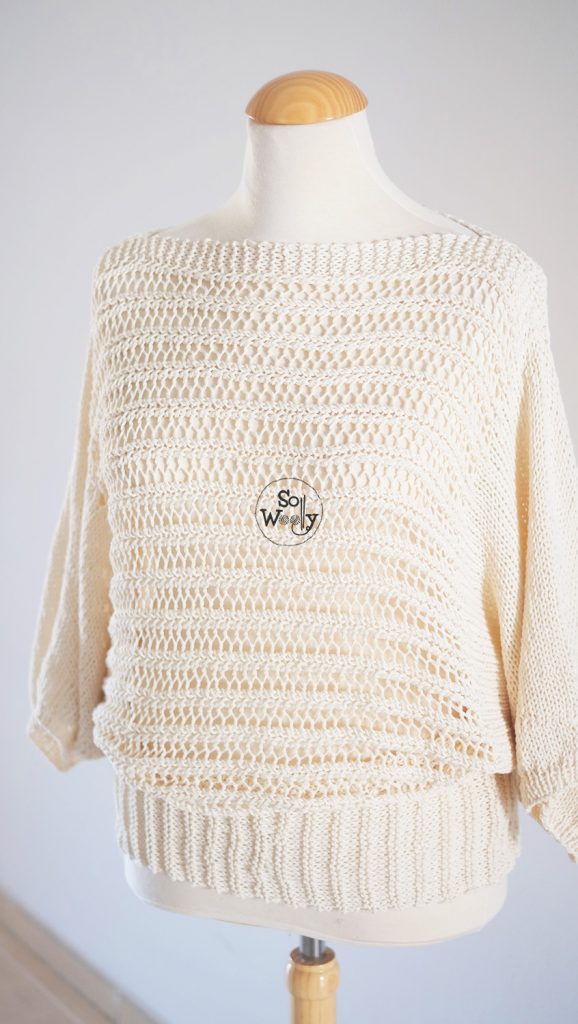
Batwing Sweater free knitting pattern
In this tutorial, you’ll learn how to knit a Batwing Sweater, step by step. A free knitting pattern, made of cotton yarn, light and loose, ideal for Summer. The sweater is also long enough to cover the hips.
I designed this pattern in 3 sizes (S, M, and L), all of them easy to modify.
It’s also possible to use another stitch pattern, just take into account that if you want to substitute the lace section, the new stitch should have multiples of 4.
Cuff to cuff Sweater Construction
To knit the Batwing Sweater, we start knitting a 1 x 1 Rib stitch section. To form the first sleeve, we make a Stockinette stitch section, gradually increasing stitches until we reach the right side of the body.
Then, we increase a certain number of stitches in one go, to form the strip that will cover the hip. Using 2 markers, we’ll divide the work into 3 parts: The first section is the hip; the second, is the lace section; and the Garter stitch section for the neckline.
At this point, no more increases will be made. We’ll continue knitting until the desired length is reached (it changes according to each size). Afterward, we’ll decrease at once all the stitches increased for the hip, change to Stockinette stitch, and continue decreasing gradually to form the second sleeve. Finally, we’ll knit the 1 x1 Rib stitch section for the cuff, and then, we’ll bind off.
Both parts of the sweater are the same (front and back), so you just need to knit the other one, and join them!
Materials
2 x 5 mm (US 8) knitting needles (these are long enough to hold all the stitches) #ad
Cotton yarn for 4 mm (US 6) knitting needles (Number 3, DK, or Light Worsted weight). Every skein has 50 grams and 110 m (120 yards) approximately:
L size: 420 gr
M size: 370 gr
S size: 320 gr
2 markers in contrasting colors (I love these rings) #ad
Scissors
Darning needle (in 3 sizes) #ad
Measurement tape or rule
Gauge
Rule of thumb!
Please, please, please…get used to knitting a gauge swatch. Always knit it first! If you don’t the result could be either a sweater for your Barbie or a poncho for an elephant! It’s preferable to spend some time knitting a 10 cm / 4 in square with the yarn and the needles specified on the pattern.
For this pattern, to avoid a heavy and dense fabric, because it is a Summer project, I’ve used cotton yarn (recommended for 4 mm needles), using 6.5 mm.
The resulting gauge is: 10 x 10 cm (4 x 4 in) knitted in Stockinette using 6.5 mm needles equals 13 stitches and 23 rows.
Note:
To give you a better orientation, in order to get the best yarn for this pattern, the original gauge for this cotton yarn (stated on the label) is: 10 x 10 cm (4 x 4 in) knitted in Stockinette using 4 mm needles equals 21 stitches and 22 rows.
Sizes (according to measurements)
S:
Chest circumference: 81 – 86 cm (32 – 34 in)
Hips circumference: 89 – 91,5 cm (35 – 36 in)
M:
Chest circumference: 91,5 – 96,5 cm (36 – 38 in)
Hips circumference: 96,5 cm – 101,5 cm (38 – 40 in)
L:
Chest circumference: 101,5 – 106,5 cm (40 – 42 in)
Hips circumference: 106,5 – 111,5 cm (42 – 44 in)
Finished Batwing Sweater Measurements (already sewn)
Total length (from the neckline to the hem) S-M-L: 56, 61, 68 cm (22, 24, 27 in).
Total with (from cuff to cuff) S-M-L: 98, 110, 126 cm (38.6, 43.4, 49.6 in).
N.B.:
1) The main stitches used are:
For the hip strip: Garter Rib stitch (4 rows)
1º row: Knit
2º row: Purl
3º row: Purl
4º row: Knit
For the lace section:
2) Odd rows form the right side of the work
3) This pattern is easy to modify: Sleeves can be longer, the hip strip can be shorter or even higher, the body can be wider or narrower…Try it on over your body as you knit, and before getting to the next section, decide if there is anything you want to change!
For example:
For longer sleeves, knit more rows when finish the increase section, and before the increases for the hip.
For a shorter sweater, increase less stitches at the hip section.
For a narrower body, knit less rows when making the body (from side to side, before binding off the stitches for the hip).
4) The pattern has been designed for the S size. Instructions for M and L sizes are between parenthesis, in the same order.
Abbreviations
CO: Cast on
WS: Wrong side of the work
st: Stitch
RS: Right side of the work
k: Knit
p: Purl
kfb: Knit one stitch back and front
k2tog: Knit two stitches together
p2tog: Purl two stitches together
yo: Yarn over or yarn forward
s1k1passo: Simple decrease (slip one stitch as if to knit, knit one, pass the slipped stitch over)
M: Marker
BO: Bind off
Batwing Sweater free knitting
pattern
CO 36 st with 5 mm (US 8).
1 x 1 Rib stitch section:
Rows 1 to 4: *K1, P1*. Repeat from * to *, to the end.
Stockinette section (first sleeve)
Change to 6.5 mm (US 10.5) needles, and increase 1 st at the beginning of every odd row, as follows:
5º and every odd row: K1, kbf, K to end.
6º and every even row: P across (these are rest rows, no increases will be made).
Repeat these two rows until there are 58 (62 – 66) st in total, ending with a P row.
Garter Rib and Lace section (body)
1º row (RS): Increase 20 (24 – 30) st for the hip strip. There are 78 (86 – 96) st in total. K the increased st only, place M, and knit the 1º row of the Trellis stitch:
1º row: *K2, yo, s1k1passo,*. Repeat from * to *, until there are 6 st left. Place M, K 6.
From now on, K these 6 st in every row (for the neckline).
2º row: K6, slip M, and knit the 2º row of the Trellis stitch:
*P2, yo, p2tog*. Repeat from * to *, to M. Slip M, P to end.
3º row: P to M, slip M, *K2, yo, s1k1passo,*. Repeat from * to *, slip M. K6.
4º row: K6, slip M, *P2, yo, p2tog*. Repeat from * to *, to M. Slip M,
K to end.
Repeat these last four rows until the fabric measures 40 (45 – 50) cm / 15.74 (17.7 – 19.7) in (from the increases for the hip strip), ending with a WS row.
Stockinette section (second sleeve)
Next row (RS): BO pretty loose 20 (24 – 30) st. There are 58 (62 – 66) st in total.
K the remain st, take off M (we won’t need them anymore).
Next row: P across.
From now on, we’ll decrease 1 st at the beginning of every odd row:
1º and every odd row: K1, k2tog, K to end.
2º and every even row: P across (these are rest rows, no decreases will be made).
Repeat these last two rows until there are 36 st left, ending with a WS row.
Change to 5 mm (US 8) needles.
1 x 1 Rib stitch section:
Rows 1 to 4: *K1, P1*. Repeat from * to *, to the end.
5º row: BO every st as it presents.
Knit the second piece, and join them. Watch the video to learn how to do mattress stitch for every part of your Batwing Sweater:
Batwing Sweater knitting video tutorial
Hope you like it and don’t forget to share your work! Tag me on Instagram or Twitter to see your sweater 😉
Happy knitting!
Hugs,
Carolina – So Woolly
As an Amazon Associate I earn from qualifying purchases