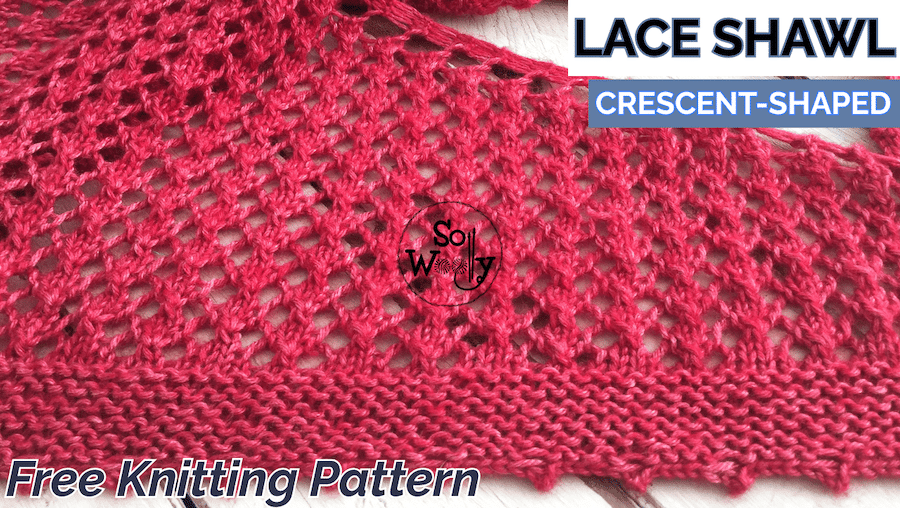
Knit a Lace Shawl with this Free Pattern + Video
Today you’ll learn how to knit a gorgeous crescent-shaped Lace Shawl, step by step.
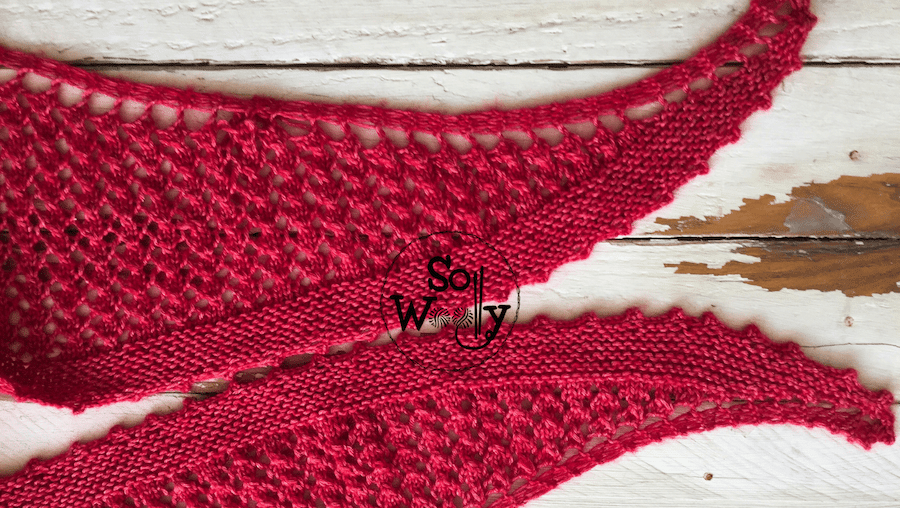
Lace Shawl Knitting Construction
It’s a top-down shawl, worked from the neck down.
Starting with a Garter Tab, that replicates the shape of a crescent moon, it alternates solid and lace sections, using two different lace knitting patterns, ending with a picot edge (which we practiced a while ago).
I designed this shawl especially for these days when you need to focus, let’s call it “knitting meditation days” 😉.
⚠️ Note for beginners: If you’re just starting to knit, this might be a tricky project; I’d recommend knitting the whole shawl in Garter stitch, or alternating Stockinette and Garter sections (the lace parts can be more challenging when you’ve got many stitches on the needle).
Or you can try the Dragon’s Tail Shawl a pattern that I modified to make it more interesting!
Download the free pattern here > Crescent Shawl Pattern Free PDF
What are the Measurements of a Crescent-Shaped Lace Shawl?
Normally, they’re between 55 to 70 in (140 to 178 cm) wide, and 16 in (41 cm) deep.
The good news is that you can make it as wide and deep as you prefer; the top-down construction allows you to put it on, and measure it as you go!
However, I made mine pretty wide, because I wanted to finish the 4 balls of yarn I had):
86 in – 212 cm wide at the top (wingspan), and 19 in – 48 cm deep at the center (these are the measurements after blocking).
Yarn and Needles I Used
200 gr. (4 balls) of 65% Merino wool yarn and 35 % silk, nº 3, light or DK
Weight / Length per ball: 50 gr. (1.76 oz.) and 140 m (153.11 yd.)
It’s a light yarn with a little shine, recommended for US 6 (4 mm) needles.
Sharp-tip circular needles, US 8 – 5 mm (minimum 32 in / 80 cm length) #ad
Tapestry needle, measuring tape, scissors, 2 markers (ring shape) and 1 marker (safety pin style)
“As an Amazon Associate, I earn from qualifying purchases”.
Abbreviations
CO = cast on
st = stitch
sts = stitches
K = knit
P = purl
yo = yarn over
PM = place marker
SM = slip marker
m1R = make 1 right (right-leaning increase). Pick up the bar (strand) between two stitches with the right-hand needle. Place it onto the left-hand needle from front to back, and knit that stitch through the front loop.
m1L = make 1 left (left-leaning increase). Pick up the bar (strand) between two stitches with the right-hand needle. Place it onto the left-hand needle from back to front, and knit that stitch through the back loop.
sl1 = slip one stitch knitwise (pass 1 stitch as if to knit onto the right-hand needle)
sl2 = slip two stitches knitwise (one by one)
psso2 = pass the slipped stitch over the last two stitches
pss2o1 = pass the 2 slipped stitches stitch over the last one
BO = bind off
How to Knit a Lace Shawl
Setup Rows
CO 3 st.
Knit 3 rows in Garter stitch.
Next row: yo, pick up 1 st from the edge garter bump, yo, pick up 3 st from the CO edge. (9 sts).
Quick Notes Before Starting
- The even rows form the RS
- When facing the RS, we’ll increase 2 sts
- When facing the WS, we’ll increase 4 sts
Garter Tab
Row 1 (WS): K3, PM, in the yo K1, yo, K1, K across to next yo, in the yo K1, yo, K1, PM, K3. (We have increased 4 sts. 13 sts remain)
Row 2 (RS): K3, SM, yo, K to next M, yo, SM, K3. (We have increased 2 sts. 15 sts remain)
Row 3: K3, SM, in the yo K1, yo, K1, K across to next yo, in the yo K1, yo, K1, SM, K3. (+4 sts, 19 sts remain).
Repeat Rows 2 – 3 until the piece measures approx. 5.5 cm (2¼ in) from CO edge, ending with Row 3. (55 sts).
When knitting an even row, place a marker (the safety pin), to show the RS.
Extra Increase Row
Next row (RS): K3, SM, yo, K until 27 sts are on the right needle, m1R, K1, m1L, K to M, yo, SM, K3.
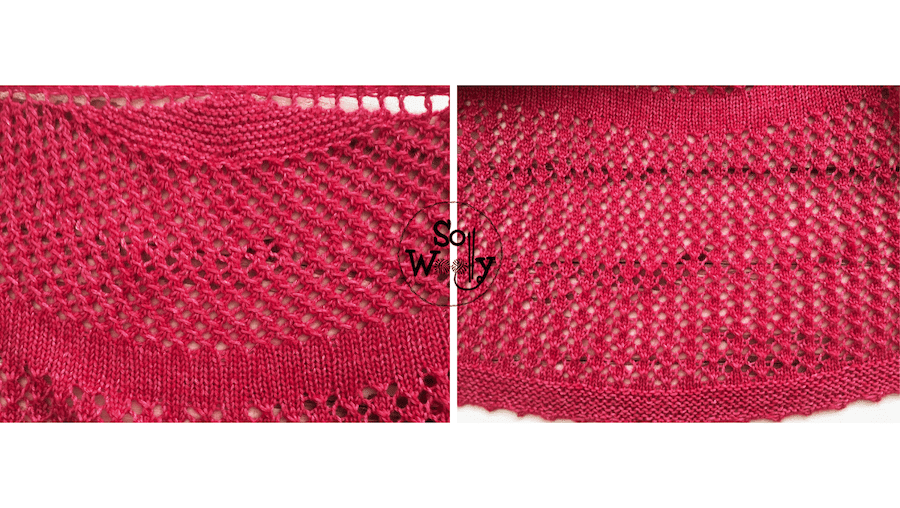
Section 1 – Mesh Stitch (4-row repeat pattern)
Row 1 (WS): K3, SM, yo, K1, *yo, sl1, K2, psso2*. Rep from * to *, until 2 sts remain before M, K2, yo, SM, K3
Row 2 (RS): K3, SM, in the yo K1, yo, K1, P to next yo, in the yo K1, yo, K1, SM, K3
Row 3: K3, SM, yo, *yo, sl1, K2, psso2*. Rep from * to *, yo, SM, K3
Row 4: K3, SM, in the yo K1, yo, K1, P to next yo, P the yo, in the edge yo K1, yo, K1, SM, K3.
Rep Rows 1 – 4 until this section measures 12 cm (4¾ in), ending with Row 4.
Section 2 – Stockinette Stitch
Row 1 (RS): K3, SM, yo, K to M, yo, SM, K3
Row 2: K3, SM, in the yo K1, yo, K1, P to next yo, in the yo K1, yo, K1, SM, K3.
Rep Rows 1 – 2 until section measures 4 cm (1½ in), ending with Row 2.
Section 3 – Lace Stitch (two-row repeat pattern)
Row 1 (RS): K3, SM, yo, *K3, yo, sl2, K1, pss2o1, yo*. Rep from * to * until 3 st before M, K3, yo, SM, K3
Row 2: K3, SM, in the yo K1, yo, K1, P to next yo, in the yo K1, yo, K1, SM, K3.
Rep Rows 1 – 2 until section measures 24 cm (9½ in), ending with Row 2.
Section 4 – Garter Stitch
Row 1 (RS): K3, SM, yo, K to M, yo, SM, K3
Row 2: K3, SM, in the yo K1, yo, K1, K to next yo, in the yo K1, yo, K1, SM, K3.
Rep Rows 1 – 2 until section measures approx. 3.5 cm (1½ in).
How to Bind-Off the Lace Shawl: Picot Edge
Facing the RS: BO 2 sts knitwise, *slip 1 st back to left-hand needle, CO 2 st, BO 4 sts knitwise*. Repeat from * to * last 2 sts, BO those 2 sts knitwise.
Finishing
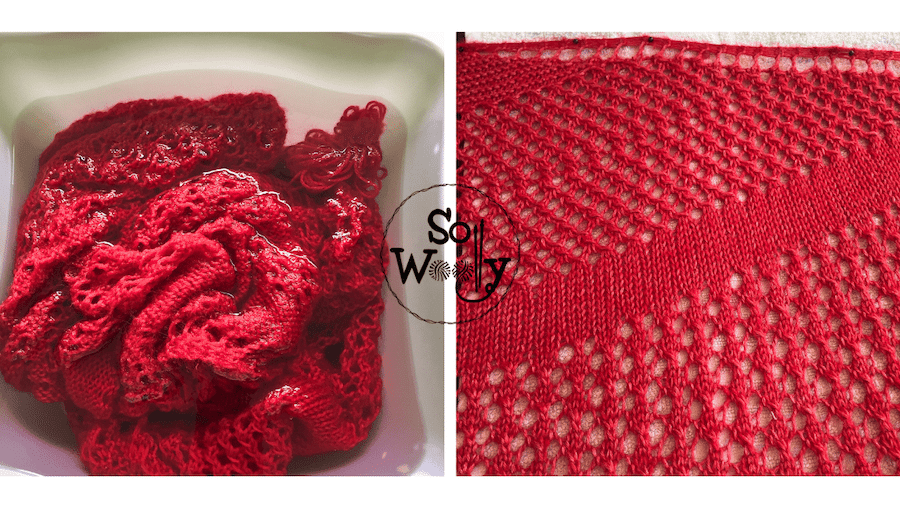
Weave in all ends, and block the shawl to open up the lace, as follows:
How to Block a Lace Shawl
Step 1: soak the shawl for some minutes (without shaking). Simply wait until the fibers absorb the humidity.
Step 2: squeeze it gently, removing the excess water, using a fresh towel.
Step 3: place the shawl over a blocking board, using the palm of your hand to flatten it, and give it the right shape (for a better result, use some pins to fix it on the blocking board).
Step 4: let it air dry (avoid sun exposure).
Download the free pattern here > Crescent Shawl Pattern Free PDF

Ways to Wear Your Hand-Made Lace Shawl
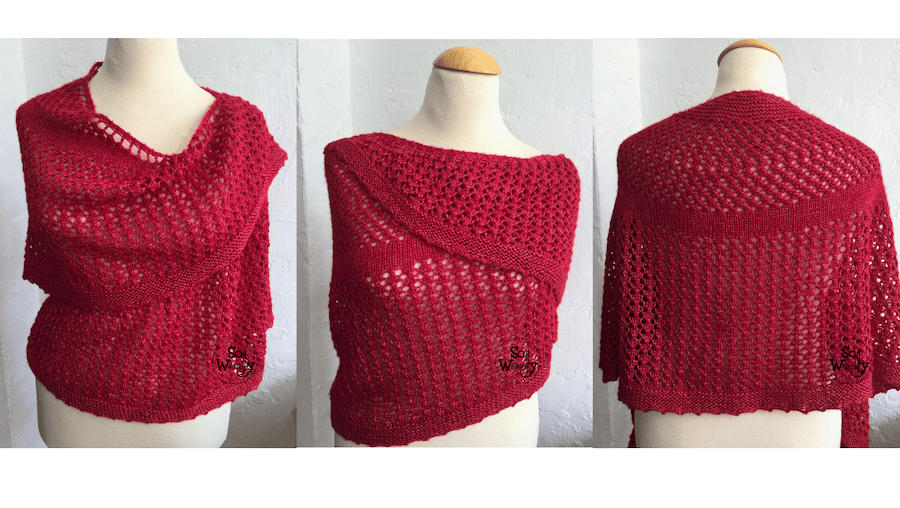
My shawl is so wide that I can use it almost as a poncho! And if I just put it on my shoulders, it covers my whole back.
I’ve also tried the “Outlander style”, and I love it (crossed at the front and wearing a belt).
Lace Shawl Knitting Pattern Step By Step
That’s all for today, my little Woolly!
I hope your Lace Shawl turns out very pretty 🌙
Share your version the Lace Shawl on Instagram @sowoolly with #laceshawl #sowoolly
Hugs, and happy knitting ✨
Carolina – So Woolly
Download the free pattern here > Crescent Shawl Pattern Free PDF