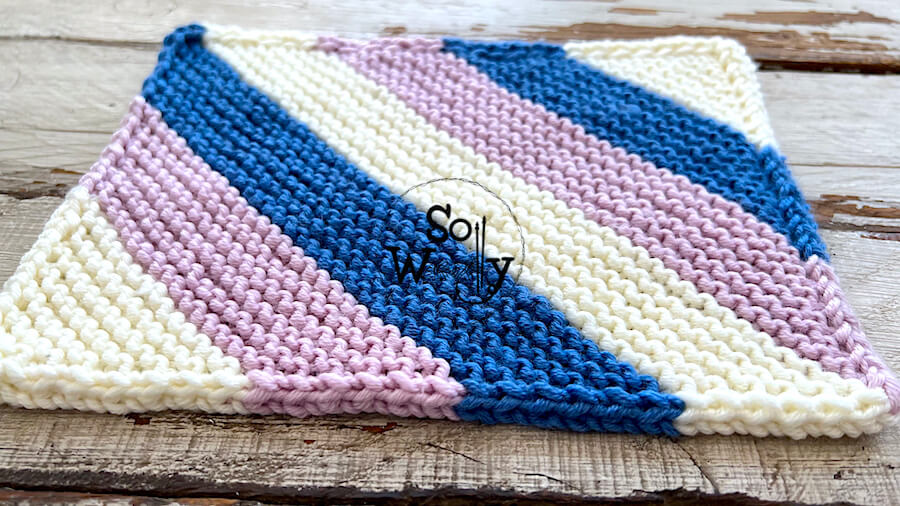
How to knit a Square or Rectangular Blanket
Today, you’ll learn how to knit a blanket or to use the scientific term blankie, using the Garter stitch 🙂
Honestly, it’s been a while since I published my last blanket pattern, and this one is definitely fun!
Easy to do, and pretty flexible…
Actually, there are several reasons why:
Firstly, there’s no specific gauge suggested, although I’m sharing a pattern that calls for worsted-weight yarn, you can use whatever you have on hand.
The magic of this blanket is that it starts and finishes with the same number of stitches for any size (from a doll blanket to an adult blanket).
And you decide how big it’s going to get… as you knit!
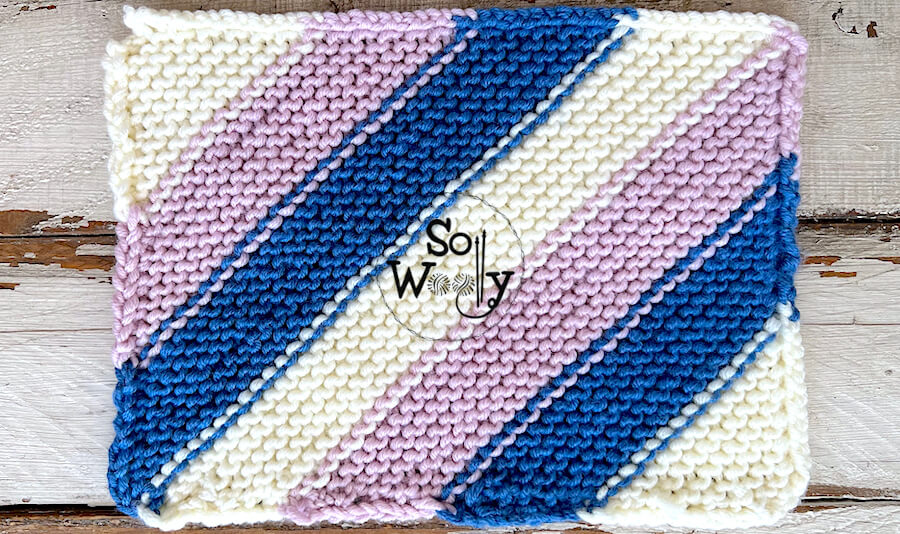
Secondly, it can be done in one, two, three, or more colors, the stripes can be as thin or wide as you like, and you can combine the colors as you prefer.
Or you could use a variegated yarn and forget about switching colors 😉
Last but not least, this technique allows us to make a square or rectangular blanket.
So, without further ado, let’s get started!
Materials for a Rectangular Blanket
Size 27 1/2 in – 70 cm height x 39 1/4 – 100 cm width
You’ll need long straight needles US 8 (5 mm) knitting needles #ad
Or even better,
Circular needles with a long cable #ad
We won’t be knitting in the round, but a long cable allows you to allocate a large number of stitches).
700 gr of worsted weight Superwash 100% Merino wool yarn (soft, elastic, and machine washable) #ad
Scissors, ruler, or measurement tape
Tapestry needle #ad
Abbreviations
CO: Cast on
st.: stitch
K: Knit
P: Purl
m1L: Make one left-leaning increase. Pick up the bar between the stitch you knit and the one you’re about to knit, bringing the needle from front to back, and place it onto the left-hand needle. Then, knit into the back of this stitch.
m1R: Make one right-leaning increase. Pick up the bar between the stitch you knit and the one you’re about to knit, bringing the needle from back to front, and place it onto the left-hand needle. Then, knit into the front of this stitch.
k2tog: Knit two stitches together
sd: Simple decrease. Slip one stitch as if to knit, place it back onto the left-hand needle, and knit that stitch and the following stitch together, through the back loop.
passo: pass the first st from the right-hand needle over the next
RS: Right side of the work
WS: Wrong side of the work
N.B.:
The rectangular blanket construction includes three parts.
In the first part, we’ll increase one stitch on each side of the work.
In the second part, we’ll increase one stitch at the beginning of the row, and decrease one at the end.
If you are knitting a square blanket, skip part 2, and got to part 3.
In the third part, we’ll be decreasing one stitch on each side.
The RS rows are the even rows; the change of color and the increases/decreases will be made always on an RS row.
The WS rows are the same throughout the whole blanket (they don’t change).
No matter the size or shape of your blanket, all of them start with 5 stitches and finish with 7 stitches.
If you’re working with stripes, the first and the last corner of the blanket have two rows more than the rest of the stripes; i.e.: If your stripes have 12 rows each, the first and the last stripes will have 14 rows.
Each time you change colors, cut the yarn and leave a tail, long enough to thread the tapestry/darning needle and weave in the ends later on.
Finally, watch the video to see the step-by-step process 😉
How to knit a Blanket (square or rectangular)
Part 1: Increasing one stitch on each side
Stripe 1 (corner)
CO 5 st.
WS row: P2, K to last 2 st, P2
RS row: K2, m1L, K to last 2 st, K2
Repeat these two rows until you have 14 rows in total (7 ridges of Garter stitch), ending with a WS row.
Stripe 2
Next row: With a new color K2, m1L, K to last 2 st, K2
Continue working, until you have 12 rows (6 ridges), ending with a WS row.
Stripe 3
Next row: With a new color K2, m1L, K to last 2 st, K2
Continue working, alternating WS and RS rows, until you have 6 ridges, ending with a WS row.
Keep repeating these 3 stripes until you have reached the desired width (39 1/4 in – 100 cm).
If you are knitting a square blanket, skip the following part and go to Part 3.
Part 2: Increasing one stitch at the beginning of the row, and decreasing one stitch at the end
The first 2 rows of this section are set up rows, and they will be worked as in part 1:
RS row: With a new color K2, m1L, K to last 2 st, K2
WS row: P2, K to last 2 st, P2
Following rows:
RS row: K2, m1L, K to last 3 st, k2tog, K1
WS row: P2, K to last st, P2
Repeat these last 2 rows until you have completed 6 ridges in this color, ending with a WS row.
Part 3: Decreasing one stitch on each side
The first 2 rows of this section are set up rows, and they will be worked as in part 2:
RS row: With a new color, K2, m1L, K to last 3 st, k2tog, K1
WS row: P2, K to last st, P2
Following rows:
RS row: K1, sd, K to last 3 st, k2tog, K1
WS row: P2, K to last 2 st, P2
Repeat these last 2 rows until you have completed 6 ridges in this color, ending with a WS row.
Continue working as before, and change colors when needed, until there are 7 st left.
Please note that this last corner (the last stripe) will have 7 ridges of Garter stitch, as the first corner of the blanket.
Bind off row (RS): K1, sd, pass the first st from the right-hand needle over the next, K1, passo, k2tog, passo, K1, passo.
Cut the yarn leaving a nice tail, pull it through the last stitch, and weave in the ends.
This is the wrong side of the work:
Enjoy the video tutorial:
How to knit a Square or Rectangular Blanket
And don’t forget to share the love!
Happy knitting 🙂
Carolina – So Woolly
PS: Searching for more blanket patterns? Take a look!
“As an Amazon Associate, I earn from qualifying purchases.”