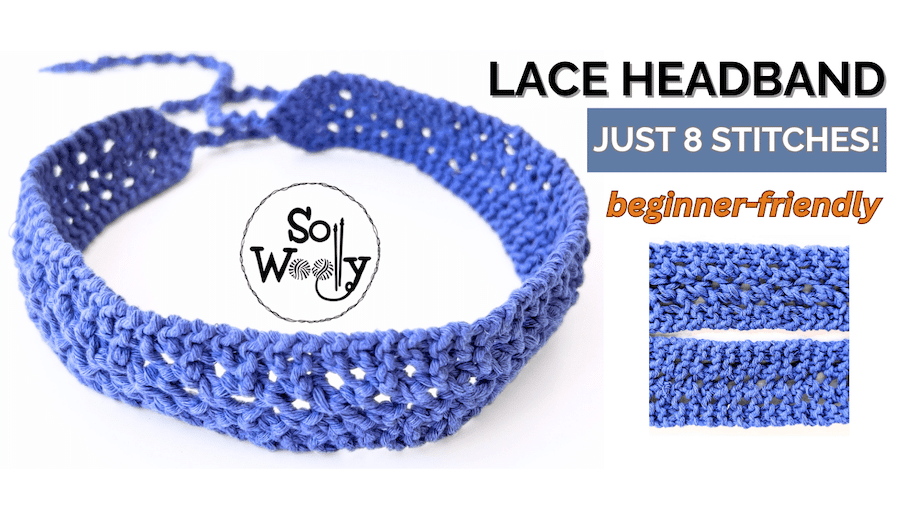
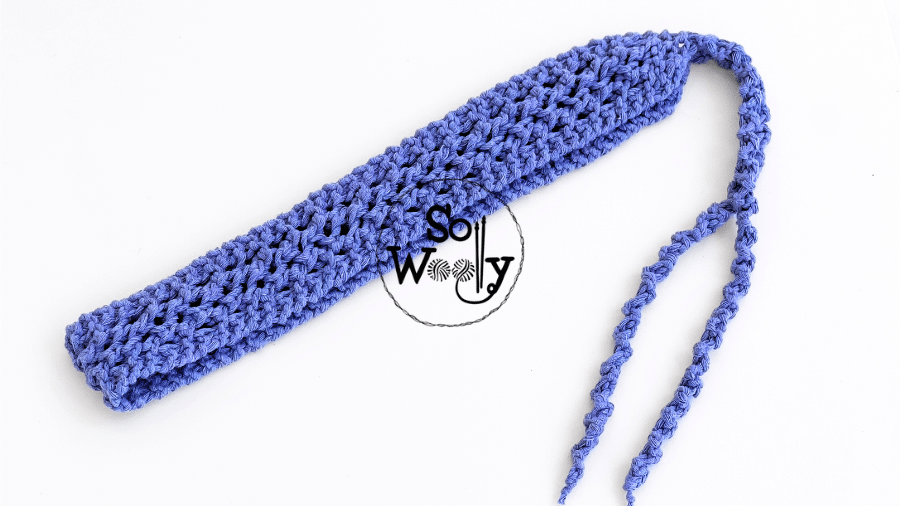
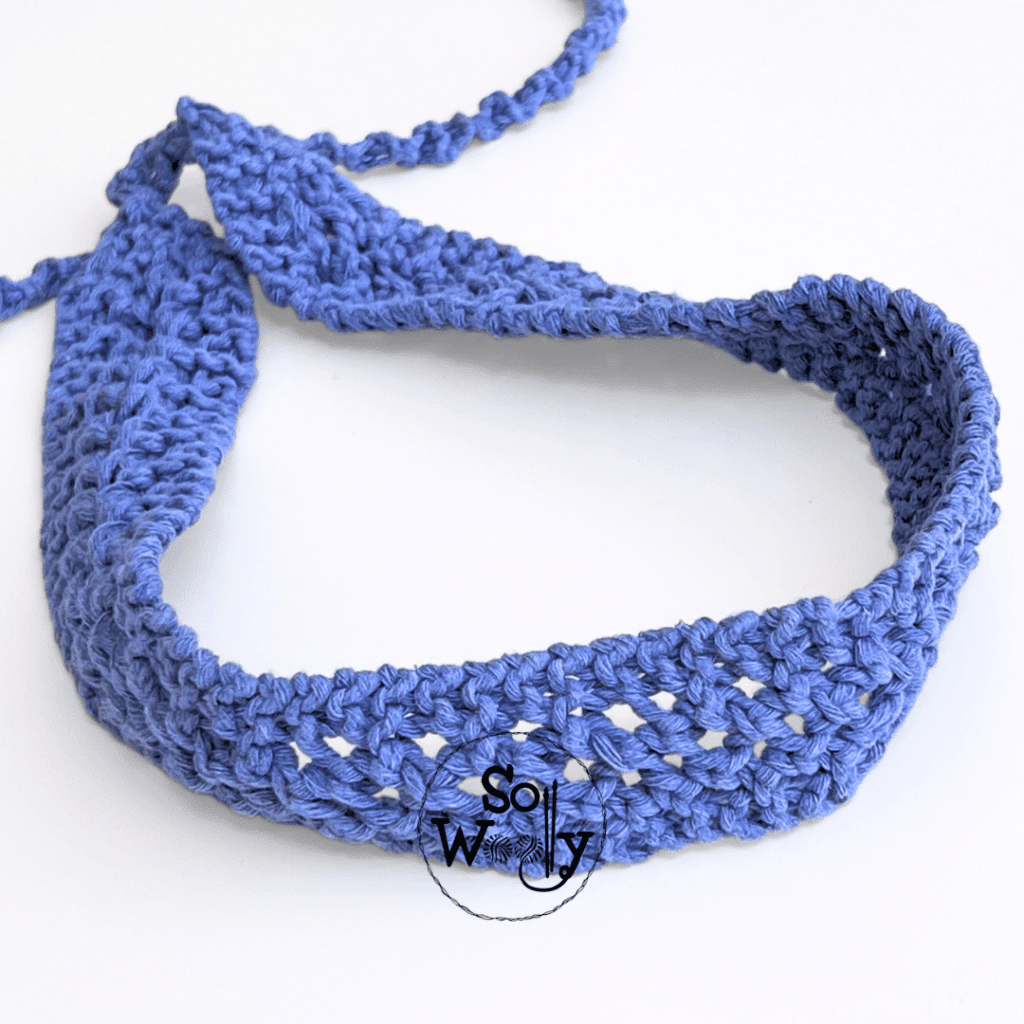
How to Knit a 1920s-Inspired Lace Headband (8 sts + Video)!
In today’s tutorial, I’m sharing how to knit a delicate Lace Headband -and it’s customizable for all sizes!
This project is not only simple and pretty, but it’s also quick to knit (just 8 stitches per row!)… ideal for the Summer.
And it’s the ideal way to use up some of that yarn stash too.
I designed this lace headband inspired by 1920s fashion, which I absolutely love, using the lace pattern we practiced last week.
If you missed it, be sure to check that post for helpful tips on lace knitting.
As you’ll see, the pattern is uncomplicated, and you don’t have to purl 😊
The best part is that you can customize it to any size; check out this chart for measurements.
However, if you’re still not feeling completely confident with lace, feel free to use another pattern—just make sure it’s a multiple of 2 stitches.
Even the garter stitch will work great!
Having said that, it’s time to knit.
Grab your needles and a little bit of yarn, and let’s get busy.
Materials For This Lace Headband:
- Needles & Yarn: Use your favorite needles and yarn! For guidance, here’s what I used for mine:
- 15g (42m/46yd) of cotton yarn (light, #3, 8-ply)
It’s a blend of 50% cotton and 50% polyester, machine washable, and durable #ad
- US 7 (4.5mm) knitting needles
For small projects like this, I love using bamboo DPNs (double-pointed needles) because they’re not slippery, they don’t get too warm or cold, and the sharp tips are perfect for lace knitting.
This set includes the most used sizes #ad
- Scissors and measuring tape
“As an Amazon Associate, I earn from qualifying purchases”.
Gauge
Gauge isn’t super important for this project, but for reference, I got:
- 23 stitches in the lace pattern = 10 cm (4 inches) approximately.
Measurements
Head Circumference: 55 cm – 21 ¾ in
Width: 3.4 cm – 1 1/4 in
Length of the each Strap: 20 cm – 8 in
Length of the Lace Section: 46.5 cm – 18 1/4 in
Total Length of the Lace Headband: 64.5 cm – 25 2/4 in
Note: The lace section is shorter than the head circumference since knitted fabric is stretchy. For my headband, the lace section is about 8.5 cm (3¼ inches) shorter. Measure as you go to be sure it fits!
When in doubt, measure as you go.
Notes Before Starting
I divided the project in 5 parts:
1.- The first strap
2.- The increase section
3.- The Lace part
4.- The decrease section
5.- The second strap
Abbreviations
CO: Cast on
st: stitch
sts: Stitches
K: Knit
kfb: Knit one stitch front and back (a simple increase).
Knit one stitch, don’t take it off the needle, and knit the same stitch again through the back loop.
k2tog: Knit two stitches together (right-leaning decrease)
WS: Wrong side of the work
How to Knit a 1920s-Inspired Lace Headband.
Strap 1
CO 2 sts and knit every st on every row until it measures 8 in – 20 cm (around 46 rows).
Increase Section
Row 1: kfb, kfb (2 sts increased. 4 sts in total)
Row 2: K across
Row 3: K1, kfb, kfb, K1 (2 sts increased. 6 sts in total)
Row 4: K across
Row 5: K1, kfb, K2, kfb, K1 (2 sts increased. 8 sts in total)
Row 6: K across
Lace Section
Row 1: K2, (k2tog, yo) twice, K2
Row 2: K across
Row 3: K2, (yo, k2tog) twice, K2
Row 4: K across
Repeat rows 1 – 4 until the desired length is reached, ending with row 4.
Decrease Section
Row 1: K1, k2tog, K2, k2tog, K1 (2 sts decreased. 6 sts in total)
Row 2: K across
Row 3: K1, k2tog (twice), K1 (2 sts decreased. 4 sts in total)
Row 4: K across
Row 5: K1, k2tog, K1 (2 sts decreased. 3 sts in total)
Row 6: K across
Row 7: k2tog, K1
Strap 2
K every st on every row until it measures the same as the strap 1.
When finished, k2tog, pull the loop, cut the yarn, and pass it through that loop to close it.
To secure it, make a knot as close to the loop as you can, and repeat the process for the strap 1.
Et voilà! Your headband is ready 👏👏👏

Click here for the video step-by-step video tutorial:
Finally, Don’t Forget to Share Your Lace Headband!
I can’t wait to see it!
Tag me @sowoolly so we can all see it and get more inspiration…
Here are some hashtags to help spread the ❤️:
#LaceHeadband
#KnittingPatternsFor Beginners
#HeadbandKnitting
#LaceKnittingForBeginners
Ok, that’s everything for today, my little Woolly!
I hope you enjoyed this tutorial.
Thank you for watching, and happy knitting! 🧶✨
Carolina – So Woolly
PS: Looking for more easy headband patterns? Click here!