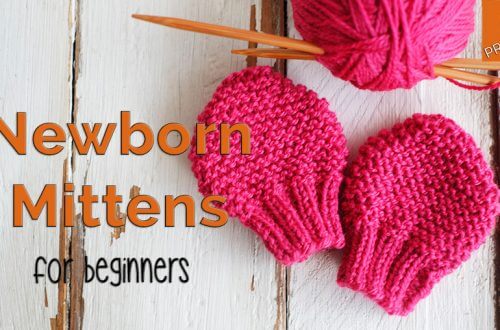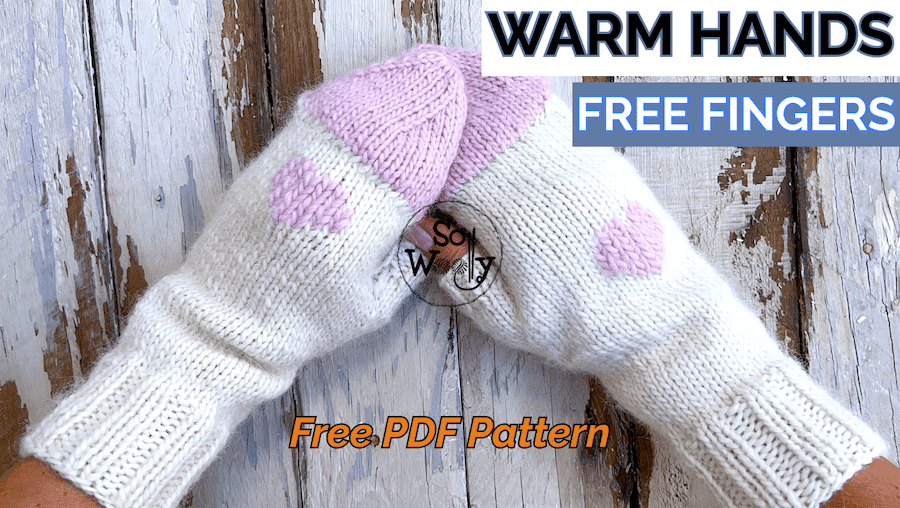
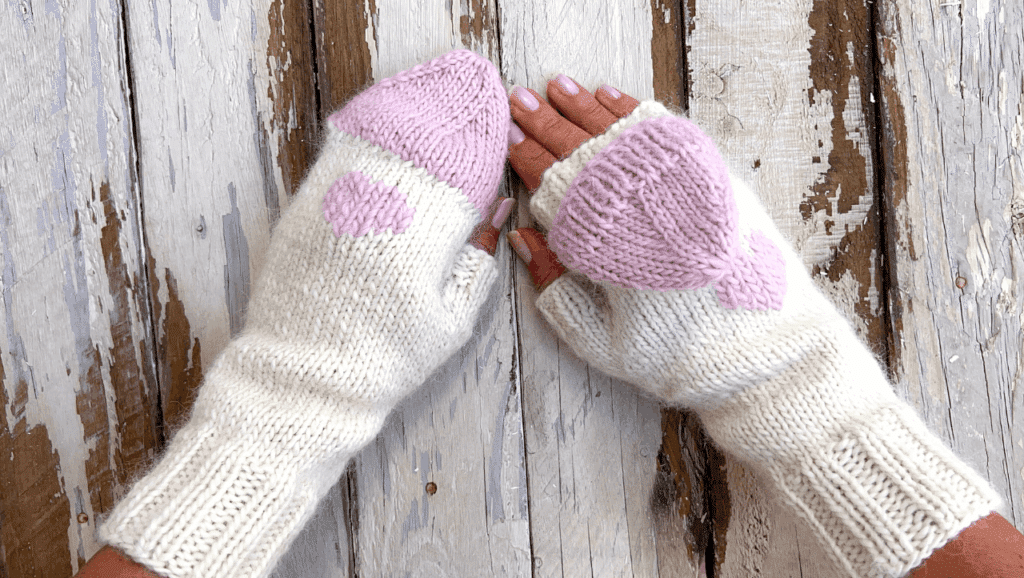
Convertible Mittens – A Simple Knitting Pattern for Winter + Video
In this tutorial, you’ll learn how to knit convertible mittens, step by step (to keep your hands warm while you scroll, type, or grab your coffee).
This project builds on the fundamentals of knitting in the round. If you’re new to circular knitting, start here → [Knitting in the Round Guide].
And want to hear good news? Both mittens, left and right are the same! Knit 1 and knit many more!
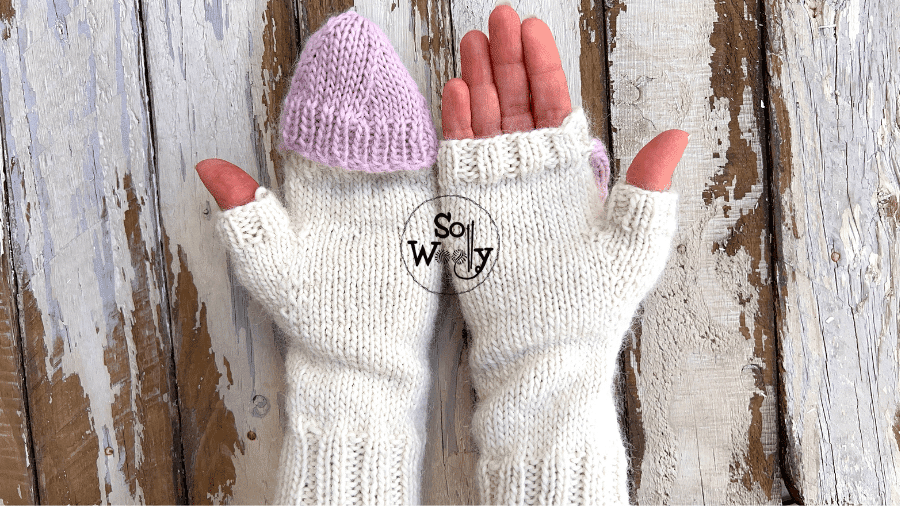
These fingerless gloves with a flap are quick to make, and easily customizable. Mix and match colors, play with yarn textures, or knit them to match your favorite hat (you could pair them with my Hipster Hat, for example).
And if you’ve never knitted in the round before (with circular needles) — don’t worry 😉
First, check out my post (and video) How to knit in the round for absolute beginners, an introduction to this amazing method to knit (completely seamless… YAY!).
Then, take a look at the second part, where I explain how to knit any size of “tubes” (gloves, hats, sleeves, socks, etc.) no matter how long the cord/cable of your circular needles is, using a technique known as The Magic Loop, and you’ll be ready to make these!
However, before you grab your yarn and needles, here are a few small tips that make a big difference when knitting convertible mittens:
👉 Download your pattern here > Convertible Mittens Free PDF
Tips for Knitting Convertible Mittens Successfully
I believe that just a few simple things can make all the difference:
1. Knit a swatch first!
You might think that because “they’re just mittens”, gauge is not too important…
Well, let me tell you: gauge still matters here. A tiny difference in tension can turn “snug and cozy” into “loose and floppy.” Knit a small 7.5 x 7.5 cm (3” x 3”) swatch in Stockinette before you start, and check your gauge.
2. Use circular needles with a long cord / cable (it’s easier for the Magic Loop technique).
If double-pointed needles make you nervous, try the Magic Loop: with a long cord you can make not only these convertible mittens, but also a sweater.
In addition, it’s a simple technique (once you learn a couple of steps, you’re ready to knit anything in the round), and it makes it easier to control your stitches, if you’re not a veteran.
3. Use cotton yarn to separate your thumb stitches.
For the thumbs, I prefer to use contrasting yarn instead of a stitch holder, I’ve tried it, and in my humble opinion, yarn it’s easier to manage.
If you don’t have cotton yarn in your stash, use anything but fuzzy yarn — you’ll thank yourself when it’s time to pick up those stitches again. It saves time, effort, and tears 😉
4. Pay attention to your tension.
Keep your yarn relaxed, especially around the flap and thumb joins. Tight stitches can make the mitten stiff or leave gaps when you pick up stitches later.
5. Try them on as you go.
Another advantage of knitting in the round is that you can check the fit anytime. Slip your hand inside and see if you need an extra round (or one less) before binding off.
6. Be patient and kind to yourself!
If this is your first pair of mittens, remember that “practice makes perfect”. It’s normal to make mistakes here and there when we’re trying something for the first time!
You’ll improve with every pair that you knit 🙂
Materials
- US 8 (5 mm) circular needles + at least 24 in length cable. I’ve been using these birch wood interchangeable needle for years, because they have sharp tips, smooth joins, and flexible memory-free cables #ad
- 70 – 90 g of worsted weight yarn (number 4, or medium), depending on the size. For my first pair, I used 100% Merino Superwash wool yarn (super smooth, fuzz-free, soft yarn, great for any accessory that touches your skin) #ad
- Tapestry needle, scissors and measuring tape
- 2 stitch markers (rings)
- scrap yarn in a contrasting color
“As an Amazon Associate, I earn from qualifying purchases”.
Gauge
A 3 x 3 (7.5 x 7.5 cm) in square in Stockinette stitch = 15 sts and 21 rounds.
Sizing / Measurements of the Finished Convertible Mittens
| Size | Hand Circumference | Full Hand Length (from the CO edge to the tip) | CO Stitches | Flap Height |
Small (6 – 8 years) | 6 1/2 in – 16 cm | 9 1/4 in 23. 5 cm | 32 stitches | 2 1/4 in – 5.7 cm |
| Medium (women’s M) | 7 1/2 in – 18 – 19 cm | 11 in – 28 cm | 36 stitches | 3 in – 7.6 cm |
| Large (women’s L / men’s S) | 8 1/4 in – 21 cm | 11 3/4 in – 30 cm | 40 stitches | 3.5 in – 8.9 cm |
How to Adjust the Length of Your Convertible Mittens
- For shorter mittens: knit 3 -4 fewer Stockinette rounds after the cuff, and (or) 1–2 fewer Stockinette rounds before shaping the flap.
- For longer mittens: add 2–3 extra rounds before the tip decreases.
Once you’ve chosen your size and checked your gauge, it’s time to cast on and start knitting your convertible mittens!
👉 Download your pattern here > Convertible Mittens Free PDF
Abbreviations
CO: cast on
st: stitch
sts: stitches
M: marker
PM: place marker
SM: slip marker
K: knit
P: purl
RLI (Right Lifted Increase): Lift the right leg of the stitch from the previous round, place it onto the left-hand needle, and knit it.
k2tog: knit two stitches together (simple decrease)
k2togtbl: knit two stitches together through the back loop (simple decrease)
LHN: left-hand needle
k2tog: knit two stitches together (simple decrease)
BO: bind off
👉 Download your pattern here > Convertible Mittens Free PDF
Instructions: How to Knit Convertible Mittens
The instructions are written for the smallest size; the rest of the sizes are shown in parentheses.
1. The Cuff
– CO 32 (36 – 38) sts, join in the round, and divide the sts in half, placing one half on one needle and the other half on the other needle (for reference, check out this post about the Magic Loop).
– Work 12 (15 – 17) rounds in 2×2 Rib Stitch: *K2, P2*. Repeat from * to *, to end (every round is the same).
2. The Hand
– Next round: Increase 2 sts as follows (I like to use the lifted increase, but you can use kfb — knit into the front and back of a stitch).
– K to the last st on the first needle, RLI twice → 2 sts increased, 34 (38 – 42) sts total.
– Work 13 (16 – 18) more rounds in Stockinette Stitch (knit across every round).
– Next Round: K3, PM, K to end.
3. Thumb Gusset
– Round 1 (increase round): K1, m1L, K to last st, m1R, K1, SM, knit to the end of the round. 2 sts increased
– Rounds 2 and 3: K across
- Size S: Repeat rounds 1 to 3 x 3 more times (4 times in total). 11 sts remain.
- Size M: Repeat rounds 1 to 3 x 4 more times (5 times in total). 13 sts remain.
- Size L: Repeat rounds 1 to 3 x 5 more times (6 times in total). 15 sts remain.
Thumb Separation
- Using the scrap yarn, thread the tapestry needle, take the bar before the first st and place it onto the LHN
- Slip 11 (13 – 15) sts (before M) onto the tapestry needle, SM
- Take the bar before the next st and place it onto the left-hand needle. There are 13 (15 – 17) sts for the thumb
- Make a knot to secure them
4. Upper Hand
– With the needle tips pointing left, CO 3 sts using the backward-loop cast-on method.
– Turn the work and k1tbl (to minimize the gap), then K to end.
– Knit 9 (12 – 15) in Stockinette Stitch (all knit).
Before Starting the Ribbing
Divide the stitches in half:
- 17 (19 – 21) sts on the front needle
- 17 (19 – 21) sts on the back needle
- Next Step: looking at the mitten from the front (if you’re knitting the left mitten, the thumb is looking to the left; if you’re knitting the right mitten, the thumb is looking to the right), and with both tips looking to the right
- Thread the tapestry needle and slip it through the 17 (19 – 21) sts from the front needle (you’re not slipping the sts onto the scrap yarn; you’re passing the scrap yarn through every st.
- When finished, leave the scrap yarn there.
How to Knit the 2 x 2 Ribbing
Work 1 round and decrease 2 sts — one at the start of each needle, as follows:
Front Needle: K2tog, K1, P2, *K2, P2*. Rep to last 2 sts, K2.
Back needle: p2tog, P1, K2, *P2, K2*. Rep to last 2 sts, P2. 32 (36 – 40) sts remain.
Work 4 (5 – 7) rounds more in 2×2 Rib Stitch.
5. The Thumb
- Pass the 13 (15 – 17) sts from the scrap yarn onto the knitting needle, removing the contrasting yarn carefully.
- Divide the sts between the two needles (it doesn’t matter how many per needle).
- Pick up 1 st from each column of the 3 sts we cast on before. 16 (18 – 20) sts remain. Arrange the sts if needed.
- Size S:
- Rounds 1 and 2: k2togtbl, k to last 2 sts, k2togtbl. 12 sts remain.
- Work 4 rounds in 2 x 2 Rib: *K2, P2*.
- Next round: BO working each st as it presents.
- Size M:
- Round 1: k2togtbl, k to last 2 sts, k2togtbl. 16 sts remain.
- Rounds 2 and 3: K across
- Work 5 rounds in 2 x 2 Rib: *K2, P2*.
- Next round: BO working each st as it presents.
- Size L:
- Rounds 1 and 2: k2togtbl, k to last 2 sts, k2togtbl. 16 sts remain.
- Rounds 3 and 4: K across
- Work 7 rounds in 2 x 2 Rib: *K2, P2*.
- Next round: BO working each st as it presents.
Check out the video tutorial below (minute 23:32 ) for how to close the gaps.
6. The Flap
– Left Mitten: facing the front of the mitten, turn it upside down (the thumb is looking to the left).
– Right Mitten: facing the front of the mitten, turn it upside down (the thumb is looking to the right).
- Pick up the 17 (19 – 21) sts you set aside with waste yarn (from right to left).
- Turn it upside down.
If you’re changing colors, start knitting them with your new yarn.
- K to end, turn the work, and CO 17 (19 – 21) new sts using the cable cast on method → 34 (38 – 42) stitches in total.
- Join in the round.
- Round 1: K across the sts on the front needle.
- Turn and work the sts from the back needle in 1×1 Rib: *K1, P1*. Repeat to last st, K1.
- Size S: Repeat round 1 x 2 more times (3 times in total).
- Size M: Repeat round 1 x 4 more times (5 times in total).
- Size L: Repeat round 1 x 6 more times (7 times in total).
How to Shape the Tip
Round 1 (all sizes):
Front needle: K1, k2tog. K to end. Turn the work.
Back needle: K1, k2tog. K to end. 2 sts decreased (32 – 36 – 40 sts remain).
Size S:
- *K6, k2tog*. Repeat from * to *, to end.
- Next round: K across
- *K5, k2tog*. Repeat from * to *, to end.
- Next round: K across
- *K4, k2tog*. Repeat from * to *, to end.
- Next round: K across
- *K3, k2tog*. Repeat from * to *, to end.
- Next round: K across
- *K2, k2tog*. Repeat from * to *, to end.
- Next round: K across. 12 sts remain (6 on each needle).
Size M:
- *K7, k2tog*. Repeat from * to *, to end.
- Next round: K across
- *K6, k2tog*. Repeat from * to *, to end.
- Next round: K across
- *K5, k2tog*. Repeat from * to *, to end.
- Next round: K across
- *K4, k2tog*. Repeat from * to *, to end.
- Next round: K across
- *K3, k2tog*.Repeat from * to *, to end.
- Next round: K across
- Knit 2 more rounds (without decreasing). 16 sts remain (8 on each needle).
Size L:
- *K8, k2tog*. Repeat from * to *, to end.
- Next round: K across
- *K7, k2tog*. Repeat from * to *, to end.
- Next round: K across
- *K6, k2tog*. Repeat from * to *, to end.
- Next round: K across
- *K5, k2tog*. Repeat from * to *, to end.
- Next round: K across
- *K4, k2tog*. Repeat from * to *, to end.
- Next round: K across
- Knit 4 more rounds (without decreasing). 16 sts remain (8 on each needle).
Cut the yarn, leaving a 10 cm (4”) tail, thread your tapestry needle, and pull the yarn through all stitches to close.
Finishing
Weave in all ends and don’t forget this little trick for a jogless bind-off.
That’s it — your convertible mittens are ready to wear!
Ready to give it a go? The video below walks you through every step — from casting on to closing the flap — so you can knit along at your own pace.
How to Knit Convertible Mittens Step-By-Step
Before You Leave
Imagine how many different pairs you can knit using this pattern: try mixing colors for the flap and the thumbs, or add stripes!
And remember: sharing is caring! Post your mittens on IG and tag me (@sowoolly) — I love seeing your work 💕
👉 Download your pattern here > Convertible Mittens Free PDF
Printable, easy to follow, and perfect to keep next to your needles.
Hugs and happy convertible mittens knitting!
Carolina – So Woolly
PS: If you prefer to knit mittens with straight needles, I have the pattern for you. Click here and you’ll find them in 3 sizes!