How to Knit the Garter Checkerboard Stitch: Stunning 3D Pattern
There’s something about the Garter Checkerboard Stitch that makes it look much more complicated than it really is — and the little twist that makes it different from so many other checkerboard patterns is surprisingly simple.
✨ Want to knit this without ads or scrolling?
👉 Click on this line if you want to download the printable PDF pattern
And believe me, I’ve knitted a lot of checkerboard patterns over the years!
But this one stopped me in my tracks…
Ready to start knitting?
In the video tutorial below, I’ll show you how to work the Garter Checkerboard stitch step by step:
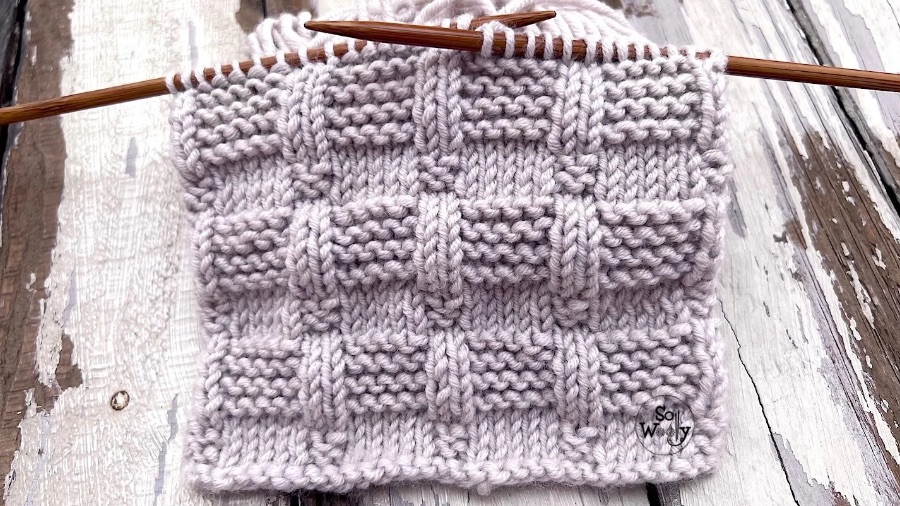
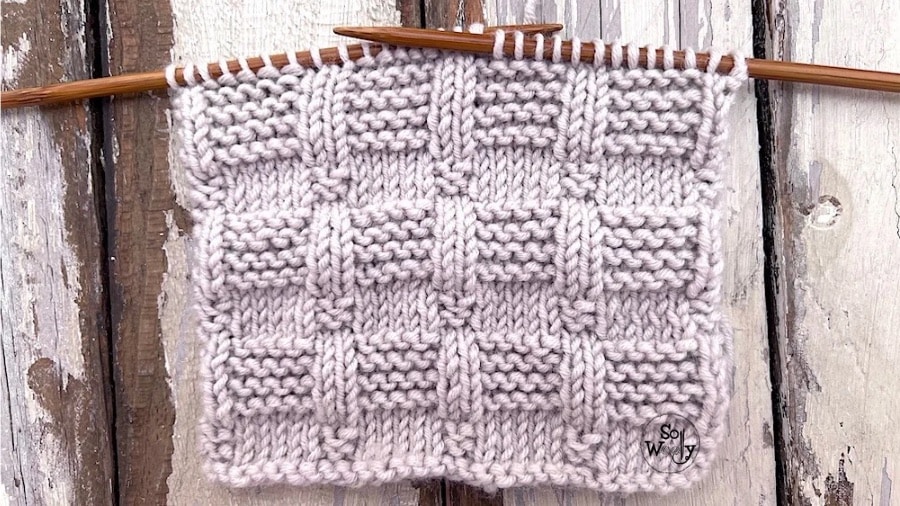
The little squares have a beautiful three-dimensional texture, and the combination of knit, purl and garter stitch gives the whole pattern a look that’s quite different from the usual checkerboard designs.
And here’s the part I really love:
No curling edges, no complicated techniques, and no need to learn anything beyond knit and purl stitches.
The pattern has a 12-row repeat, but don’t let that scare you. Every odd-numbered row is simply knitted, while the even-numbered rows use a short repeat that’s surprisingly easy to remember.
In fact, once you look at how the rows are organised, you’ll see that there’s much less to memories than those 12 rows suggest.
So if you love classic checkerboard patterns but would like to give them a little twist, this one’s for you 😊
A Checkerboard Stitch With a Twist
There are plenty of checkerboard stitch patterns out there, but this one caught my attention because it doesn’t look like the usual versions.
The secret is the combination of knit, purl and garter stitch.
Instead of simply alternating blocks of knits and purls, the garter sections change the way the fabric sits and give the little squares a lovely raised, dimensional appearance.
The texture catches the light beautifully, too, which makes the pattern look much more elaborate than the techniques used to create it.
And yet, you’re still just knitting and purling.
That’s my kind of fancy.
Where to Use the Garter Checkerboard Stitch
This stitch is wonderfully versatile because it doesn’t curl and has plenty of texture without being overly complicated.
You could use it for:
- Sweaters and cardigans
- Vests
- Hats and beanies
- Cowls
- Baby blankets and garments
- Scarves and wraps
- Cushions
- Blankets and throws
- Place-mats
- Table runners
- Rugs
- And plenty of other home decor projects
It’s also a lovely choice when you want to add texture to a garment without covering the entire piece in a complicated stitch pattern.
Try it on a hem, cuffs, a yoke or a smaller section of the fabric — or let the texture take centre stage and use it throughout your project.
Not sure how many stitches to cast on? Check out my guide to calculating stitches, yarn and measurements for any project. It takes the guesswork out completely!
My Best Tip for Knitting the Garter Checkerboard Stitch
Pay Attention to Your Tension
As a knit and purl pattern, tension is key if you want those little offset blocks to rise.
So, I’m going to give you my little trick (again): after every purl stitch, give your yarn a gentle tug.
Why?
Purl stitches can sometimes leave a little more yarn between stitches than we realize. That extra bit may barely be noticeable while you’re knitting, but as more rows build up, those tiny loose loops can add up and make the fabric look less crisp and defined.
So just remember:
Purl → gentle tug → keep knitting 😊
You don’t need to pull tightly — just a gentle tug to take up that extra yarn and keep everything neat and even.
It’s such a small detail, but it can make a huge difference (since I learned this, my ribbing, checkerboards, basket-weave and in general, knit and purl patterns, look better than ever!).
✨ Want to knit this without ads or scrolling?
👉 Click on this line if you want to download the printable pattern (PDF file)
A 12-Row Repeat That’s Easier Than It Sounds
Don’t let the 12-row repeat put you off.
The good news is that every odd-numbered row is simply knitted. Yes — just knit across!
The even-numbered rows contain the actual checkerboard pattern, but there’s a very short repeat that’s surprisingly easy to remember.
And once you look at the instructions closely, you’ll notice something else:
Rows 2 and 4 are the same.
Rows 6, 8, 10 and 12 are also the same — and they’re very similar to rows 2 and 4.
So although the stitch technically has a 12-row repeat, there’s much less to keep track of than you might expect.
It’s a lovely example of how a knitting pattern can look complicated on the fabric while being wonderfully straightforward on the needles.
Not Reversible — But Still Very Useful
I wouldn’t call this a reversible stitch, and that’s worth mentioning before you cast on.
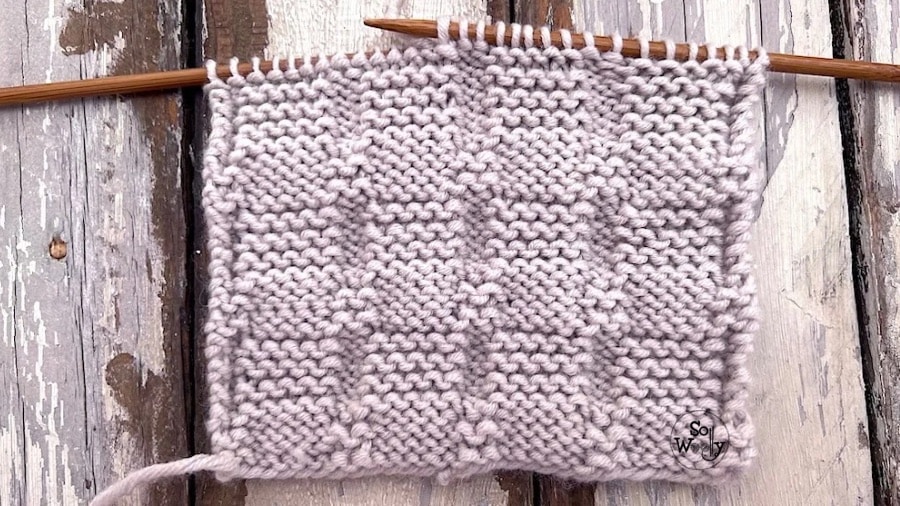
The right side has the beautiful three-dimensional checkerboard texture, while the wrong side looks quite different — more like rows of little squares created by the stockinette and garter sections.
It’s not the side I’d choose to show off.
But that’s perfectly fine!
What makes this stitch special is the texture on the right side and the fact that the fabric lays flat, not reversibility.
And that opens up a huge number of possibilities for garments, accessories and home decor.
Materials
For this swatch I used:
US 7 (4.5 mm) bamboo knitting needles (this set comes with 18 pairs, case and useful accessories) #ad
And 100% Merino wool yarn (smooth, soft, structured and machine washable) #ad
This is the other side of the work:
“As an Amazon Associate, I earn from qualifying purchases.”
Abbreviations
CO: cast on
st (s) = stitch (es)
RS: right side of the work
K: knit
P: purl
WS: wrong side
BO: Bind off
How to Knit The Garter Checkerboard Stitch
Stitch Multiple
CO multiples of 7 + 2 (edge sts).
For example: 7 * 3 = 21 + 2 (edge sts) = 23 sts.
Instructions
Rows 1, 3, 5, 7, 9 and 11 (RS): K across
Rows 2 & 4: K1 (edge), *K1, P5, K1*. Repeat from * to * to last st, K1 (edge)
Rows 6, 8, 10 and 12: K1 (edge), *P1, K5, P1*. Repeat from * to * to last st, K1 (edge).
Repeat rows 1 – 12. For symmetry, BO working each st as it presents after row 3 (WS).
💌 Before you Leave: Join the So Woolly Community
If you enjoyed this tutorial, join me for personal notes, thoughtful lessons, and calm knitting guidance — delivered straight to your inbox.
No overwhelm. No pressure. Just clarity and steady progress.
A big hug, and happy knitting,
Carolina – So Woolly
PS: Love the Garter Checkerboard stitch? Take a look this one!