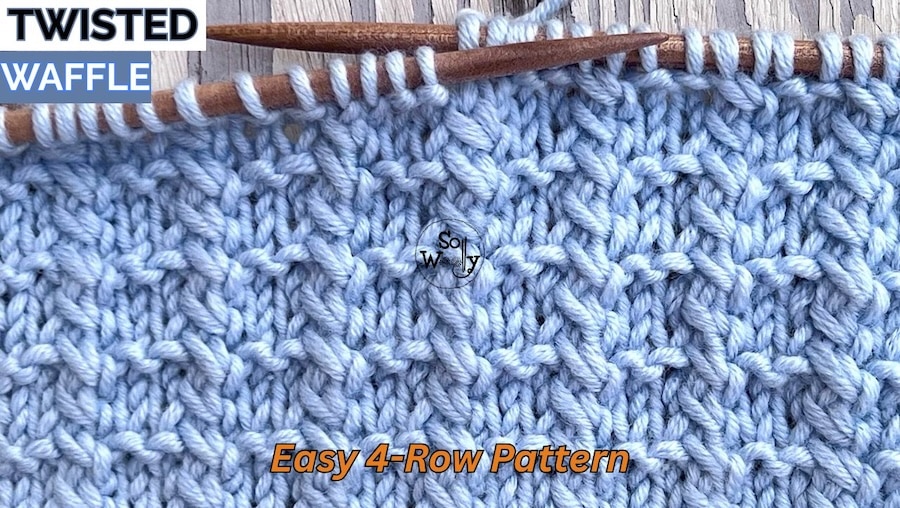
Stunning Twisted Waffle Stitch You’ll LOVE Knitting + Video
If you’re craving a stitch pattern that delivers serious texture without making you feel like you need a PhD in cable knitting, let me introduce you to my new favorite: the Twisted Waffle Stitch.
This beauty gives you all the dimensional drama of cables—those gorgeous twisted columns, that satisfying 3D pop—but here’s the kicker: no cable needle required.
Yep, you read that right.
Instead of juggling a third needle and muttering under your breath (we’ve all been there), you’re working simple left twists that create mini cable-like effects using just your two working needles. It’s cables’ cooler, easier cousin, and honestly? I might love it even more.
The Twisted Waffle combines:
- Classic waffle stitch structure (those cozy K2/P2 sections)
- The Left twist technique that creates continuous textured columns
- An easy 4-row repeat you’ll memorize in about five minutes
The result? A stitch pattern that looks like it took you hours of concentration but actually knits up fast and feels almost meditative once you get into the rhythm.
Perfect for dishcloths, scarves, cowls, bags—basically anything that needs structure, texture, and that “wow, did you really make that?” factor.
Ready to fall in love with twisted stitches? Let’s do this!
✨ Community Request Alert! This tutorial came from YOU—my amazing YouTube followers—when I asked what you wanted to learn this year. Keep those requests coming!
Top Reasons to Try the Twisted Waffle Stitch
Stunning texture you won’t see everywhere
This isn’t your standard waffle stitch. The twisted columns create dimensional drama that makes people stop and ask, “Wait, how did you do that?”
Cable effects without a cable needle
All that gorgeous texture comes from simple left twists—no third needle, no fuss, just strategic knitting that looks way more complicated than it actually is.
Easy 4-row repeat
Once you’ve got the left twist technique down, this pattern practically knits itself. You’ll memorize it fast.
Perfect for structured projects
The fabric has body and definition, making it ideal for cowls, bags, dishcloths, and anything that benefits from a bit of stiffness and texture.
Skill Level: Advanced beginner to intermediate.
If you’re comfortable knitting through the back loop and following a 4-row repeat, you’re ready for this one.
A note about borders: This stitch does curl (because of the stockinette-based structure on the wrong side), so if you’re knitting something that needs to lay flat—like a scarf, a dishcloth or a blanket—plan to add a garter or seed stitch border. Think of it as giving your gorgeous texture a frame!
Yarn & Needles I used For the Twisted Waffle Stitch
This swatch was made with 100% Merino Superwash wool yarn (super soft, structured, no halo/fuzziness), worsted weight, medium, or number 4 #ad
And I used the recommended needle size: US 8 (5 mm).
I prefer bamboo or wooden needles, and this set is one of my favorites (short pointy, smooth, beautiful needles made out of birchwood) #ad
“As an Amazon Associate, I earn from qualifying purchases.”
What Makes This Waffle “Twisted”?
Here’s the fun part: this isn’t the traditional basic waffle stitch!
The Twisted Waffle pattern creates those gorgeous textured columns you see using left twists (LT)—a mini cable technique that requires zero cable needles.
Yep, no third needle to hold stitches. Just you, your working needles, and a simple trick.
Here’s how the left twist works:
Step 1: Skip the first stitch on your left needle and knit into the back of the second stitch (through the back loop). Don’t drop either stitch yet—keep them both on the left needle.
Step 2: Now knit the first stitch (the one you skipped) normally through the front.
Step 3: Drop both stitches off the left needle together.
Boom! You’ve just created a left-leaning twist that looks like a tiny cable.
In this pattern, you’re working these left twists in Rows 1 and 3, creating continuous twisted columns throughout the waffle structure.
Combined with the classic K2/P2 sections in Row 4, you get way more depth than a standard waffle stitch.
Twisted Stitches vs. Accidental Twisting (Yes, They’re Different!)
Okay, let’s clear up some confusion because this trips up SO many knitters—even experienced ones.
There are two completely different things that get called “twisted stitches,” and understanding the difference is crucial for this pattern:
Intentional Twist Stitches (what we WANT in this pattern): When you work the stitches not in a regular way (on purpose) to create a cable effect; i.e.: instead of knitting through the front loop, you knit (or purl) through the back loop.
Involuntary Twisted Stitches (what we DON’T want): These happen when your regular knit or purl stitches sit the other way around on the needle.
How to differentiate them:
Look at your stitches on the needle. A correctly mounted stitch (standard/western counterclockwise yarn throw method) has its right leg in front of the needle and the left leg behind. If the twist is involuntary, the legs cross at the base forming an “X” which makes the stitch feel tighter.
Here’s the thing: in THIS pattern, you’re only twisting stitches during the left twist technique. All your other knit and purl stitches should sit normally on the needle with the right leg forward.
If ALL your stitches are accidentally twisted, your Twisted Waffle won’t look right—the columns won’t pop the way it should.
Quick check: When you’re about to knit a regular stitch (not part of a left twist), insert your right needle from left to right through the front of the stitch. It should feel smooth and open easily. If it feels tight and the stitch forms an X at the base, it’s sitting backwards—just knit it through the back loop to untwist it, or slip it off and put it back on correctly.
Why Twisted Stitches Rock in This Pattern
Let me tell you why these intentional left twists make the Twisted Waffle pattern so special:
1. Texture and Structure: The twists pop forward from the background, giving you that satisfying 3D effect that we knitters LOVE, creating a fabric that holds its shape!
2. Visual definition Here’s where it gets really good: those twisted columns contrast beautifully against the waffle texture. The twists are tight and defined, while the surrounding K2/P2 sections are more relaxed. It’s that contrast that makes the pattern sing.
3. Cables are having a serious moment in 2026 Cables are everywhere right now in 2026 > Twisted stitches give you that same high-impact texture with less effort.
The bottom line: The twisted stitches aren’t just decorative—they’re functional.
So go ahead, embrace those twists. Your Twisted Waffle deserves them ✨

Abbreviations
CO: Cast on
st: stitch / sts: stitches
RS: right side of the work
wyif: with yarn in front
sl1pw: Slip one stitch purlwise (pass it onto the right hand needle as if to purl)
wyib: with yarn in back
K: knit
P: purl
LT: left twist. Knit the second st from right to left through the back loop without dropping it, then knit the first normally, drop both.
BO: Bind off
WS: wrong side of the work
Quick Note Before Starting
For perfect edges, slip the first stitch as if to purl and knit the last one in every row.
Rows 1 and 3 will be worked the same.
Twisted Waffle Stitch Knitting Pattern
CO multiples of 4 + 2 + 2 sts (edge). For example: 4 * 4 = 16 + 2 = 18 + 2 = 20 sts.
Rows 1 and 3 (RS): wyif sl1pw (edge), *LT, K2*. Repeat from * to *, to last st, K1 (edge)
Row 2: wyif sl1pw (edge), P to last st, K1 (edge)
Row 4: with yarn in front slip the first st purlwise (edge), K2, *P2, K2*. Repeat from * to *, to last st, K1 (edge).
Repeat rows 1 – 4 until the desired length is reached.
When finished, BO working each st as it presents after row 3 (WS).
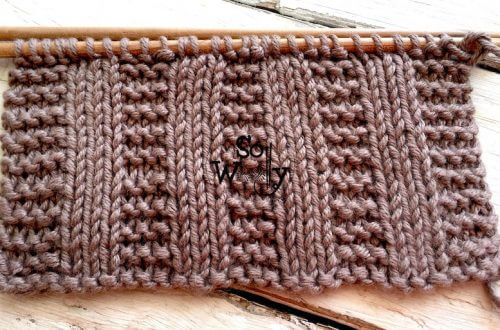
This is the other side of the work:

How to Knit the Twisted Waffle Stitch
What’s Next? Let’s Keep Knitting Together!
I hope you loved this Twisted Waffle Stitch! If you make it, I’d absolutely love to see your project—tag me on Instagram @sowoolly
Thank you for being here and for knitting with me!
Hugs and happy knitting ✨
Carolina – So Woolly
PS: Want more patterns, tutorials, and knitting inspiration?
💌 Join my email family! If you loved this kind of “looks fancy but isn’t” stitch, you’ll love my weekly emails. I always share practical stitches you can actually use. Every week, I share:
- Free patterns and tutorials (like this one!)
- Knitting tips and techniques that actually help
- A little conversation and encouragement to keep your needles moving 💃 🕺
No spam, no overwhelm—just me, sharing what I love with knitters who love it too.
[Subscribe here—I’d love to have you! ⤵️]