How to Knit a Reversible Down Arrow Stitch
In this tutorial, you’ll learn how to knit a reversible Down Arrow Stitch, easy and full of texture (similar to the Little Arrows Stitch we practiced a while ago).
Honestly, when I saw it, I fell in love again; there are several reasons why…
First, it’s easy to knit (the only techniques required are knit and purl stitches; there’s no need to make increases or decreases).
Second, both sides look pretty, and different, but lovely, so it’s perfect for a scarf, a blanket, or an infinite cowl.
Third, its texture is pretty rich and cute at the same time, so it will work not only for a baby blanket, but also for adult accessories, or even home decor items.
Moreover, it will look great as a central panel on a sweater, for example.
Last but not least, I think I’d block my project once it’s finished, especially when working with wool yarn or its blends (to get a better definition of the motif).
So, there you have it, a versatile pattern, suitable for beginners and veteran knitters, and for many projects.
Without further ado, grab your needles, and let’s knit a gorgeous swatch 🙂
This swatch was made out of 100% wool yarn (nº 4 or worsted weight) #ad
Using one of my favorite interchangeable needles (US 8 / 5 mm) #ad
“As an Amazon Associate, I earn from qualifying purchases.”
Abbreviations
CO: Cast on
st: Stitch
RS: Right side of the work
K: Knit
P: Purl
BO: Bind off
WS: Wrong side of the work
N.B:
The odd rows form the right side of the work.
The selvage (edge) stitches (the first and the last) will be knitted on every odd row, and purled on every even row.
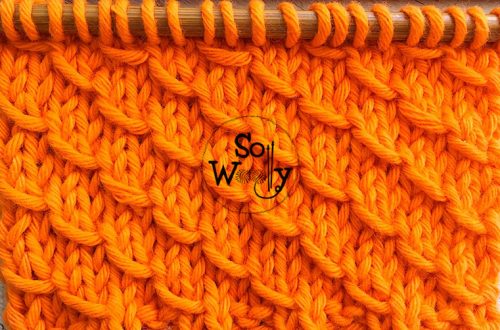
How to Knit a Reversible Down Arrow Stitch Pattern
CO multiples of 18 + 2 + 2 (edge stitches); i.e.: 18 * 2 = 36 + 2 = 38 + 2 = 40 st.
Row 1 (RS): K1 (edge), *[K2, P2] twice, K4, P2, K2, P2*. Repeat from * to *, to last 3 st, ending with K2, K1 (edge)
Row 2: P1 (edge), P2, *K1, P2, K2, P6, K2, P2, K1, P2*. Repeat from * to *, to last st, P1 (edge)
Row 3: K1 (edge), *K4, P2, K2, P1, K2, P1, K2, P2, K2*. Repeat from * to *, to last 3 st, ending with K2, K1 (edge)
Row 4: P1 (edge), P2, *P1, K2, [P2, K2] 3 times, P3*. Repeat from * to *, to last st, P1 (edge)
Row 5: K1 (edge), *[K2, P2] twice, K4, P2, K2, P2*. Repeat from * to *, to last 3 st, ending with K2, K1 (edge)
Row 6: P1 (edge), P2, *K1, P2, K2, P6, K2, P2, K1, P2*. Repeat from * to *, to last st, P1 (edge)
Row 7: K1 (edge), *K4, P2, K2, P1, K2, P1, K2, P2, K2*. Repeat from * to *, to last 3 st, ending with K2, K1 (edge)
Row 8: P1 (edge), P2, *P1, [K2, P2] 3 times, K2, P3*. Repeat from * to *, to last st, P1 (edge).
These eight rows create the pattern. Repeat them until the desired length is reached.
When finished, BO working each stitch as it presents, after row 7 (WS).
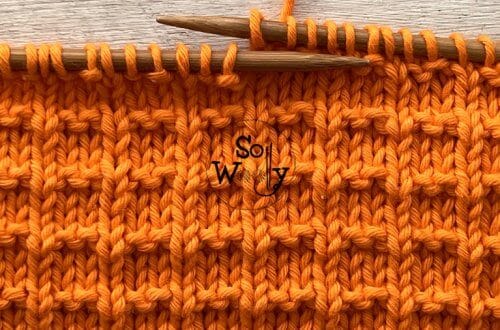
This is the other side of the work:
Enjoy the video tutorial:
How to Knit a Reversible Down Arrow Stitch
Thank you for watching, and don’t forget to share the love <3
Hugs, and happy knitting,
Carolina – So Woolly