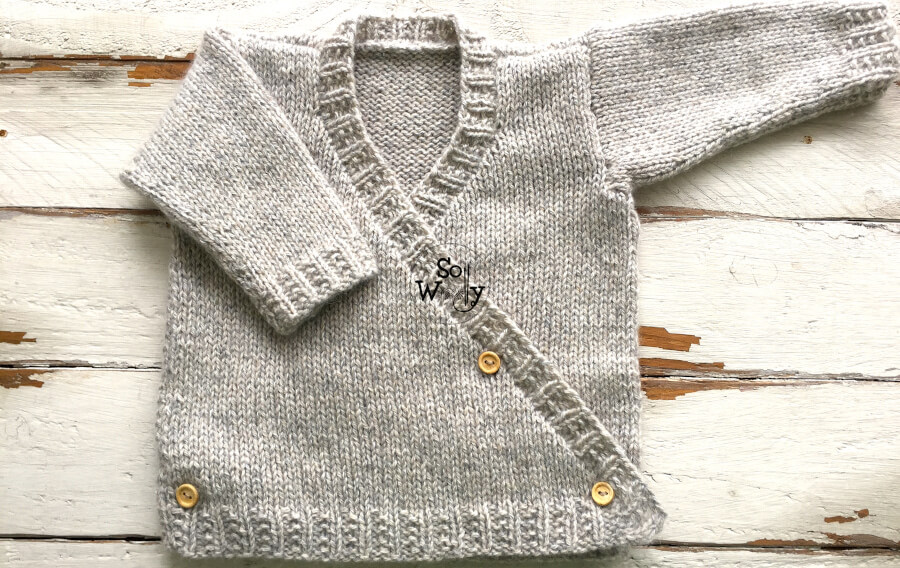
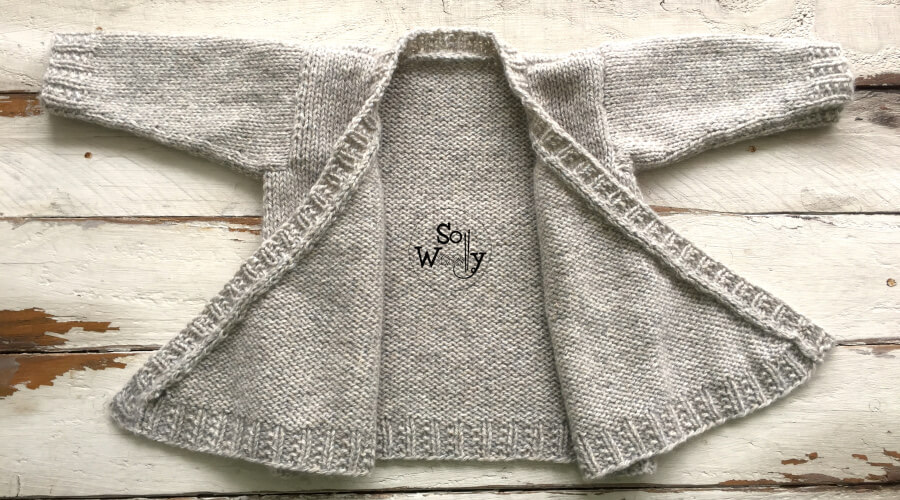
Baby Kimono (Cardigan, Jacket) knitting pattern – So Woolly
In this tutorial, you’ll learn how to knit a cardigan, jacket or baby kimono, step by step.
This pattern comes in two sizes: 0-3 months and 6-9 months approximately, and you’ll see the instructions for the smallest size first (the indications for the largest one are between parentheses).
The Baby Kimono has standard measurements, but not all babies are the same size, at a specific age, it’s important to check them before starting. For example, the largest size could also fit a 12 month old child.
Materials
7 US / 4,5 mm knitting needle (although we won’t be knitting in the round, I recommend circular needles for this project, because it will make it easier to pick up stitches and knit the edge).
These are my favorites! I use them all the time 😉 #ad
And these are the cords needed for any sort of project:
I have used two different brands (same quality and thickness, it means, same gauge):
For the largest size: 200 gr (300 m) of “Eco Cashmere” from the brand Nordic Yarn (for 7 US / 4,5 mm knitting needles).
For the smallest size: 100 gr (140 m) of “Cachemire +” from the brand Bèrgere de France (for 7 US / 4,5 mm knitting needles).
3 buttons of 1 cm diameter (0.39 in) #ad
Measurement tape or ruler
Scissors
Tapestry needle
And this box has all the accessories and tools you’ll need for many projects! #ad
Gauge
Before doing anything else, you should knit a gauge swatch at least 4 x 4 in (10 x 10 cm), to be sure that your Baby Kimono will be the same size as the pattern.
Every knitter employs a different tension on their yarn while knitting, and sometimes it’s not enough to follow the recommendation from the manufacturer shown on the label.
For this pattern, the gauge is:
A 4 x 4 inches square knitted in Stockinette stitch has 21 stitches and 31 rows.
If you get less stitches per inch, go down at least one needle size; if you are getting more stitches per inch, go up at least one needle size.
Rule of thumb: If your gauge is different, the size of your Baby Kimono will be too.
Abbreviations
CO: Cast on
st: Stitch
RS: Right side of the work
WS: Wrong side of the work
K: Knit
P: Purl
yo: yarn over or yarn forward
sd: Left-leaning simple decrease [slip 1 stitch (pass one stitch onto the right-hand needle knitwise), knit the following, and pass the slip stitch over this last one].
k2tog: Right-leaning decrease (knit two stitches together).
inc: Increase 1 stitch (I’ve used a pretty discrete increase, almost invisible, that you’ll see in the video. You could also use the classic knit one stitch back and forth “kfb”).
BO: Bind off
N.B:
The odd rows form the right side of the work.
This pattern is written in sections: Each time we start a section, the row count starts again.
Back side
Ribbing section
CO 39 (51) st, and knit 2 (3) cm in Broken Rib stitch, as follows:
1º row: *K1, P2*. Repeat from * to * to the end.
Repeat this only row until the piece measures 2 (3) cm, ending with a WS row (around 4 rows for the smaller size; 6 rows for the larger).
Stockinette stitch section
1º row (RS): K across
2º row: P across
Repeat rows 1 and 2 until this section measures 12,5 (15) cm, ending with a WS row (the piece measures 14,5 (18) cm in total).
Armhole
Next row (RS): BO 2 (4) st knitwise, K to the end.
Next row: BO 2 (4) st purl wise, P to end.
There are 35 (43) st left.
Keep knitting in Stockinette stitch until the piece measures 5 (7,5) cm from the armhole, ending with a WS row.
Neckline and Shoulders
On the next row (RS), K 13 (16) st, BO 13 (15) st knitwise, K to end.
Now that we have split the back we should have 11 (14) st for each shoulder. First, we will work on one shoulder, and then on the next.
Turn the work and P to the end.
Next row (RS): K1, sd, K to end. We have decreased 1 st.
Turn the work and P to the end.
Next row (RS): BO 10 (13) st knitwise.
For the other shoulder (WS), attach the yarn coming from the ball, leave a 10 cm tail, and P to end.
Turn the work, K to lat 3 st, k2tog, K1. We have decreased 1 st.
Next row: P across
Next row: BO 10 (13) st knitwise.
Left Front
Ribbing
Repeat the process from the back (CO the same amount of st and work the same number of rows in Broken Rib stitch).
Stockinette section
1º row (RS): K to last 3 st, k2tog, K1. We decreased 1 st.
2º row: P
Repeat rows 1 and 2 until the piece measures 14,5 (18) cm in total (ending with a WS row).
Armhole
On next row (RS), BO 2 (4) st knitwise, K to end.
Continue knitting in Stockinette stitch, decreasing on every odd row as before, until the piece measures 5 (7,5 cm) from the armhole, ending with a WS row.
There are 10 (13) st left.
Shoulder
Next row (RS): BO knitwise.
Right Front
Ribbing
Repeat the process from the back and left front (CO the same amount of st and work the same number of rows in Broken Rib stitch).
Buttonholes
We start doing 2 buttonholes, one at the beginning, and one at the end of the row, as follows:
1º buttonhole row (LD): K2, yo, sd, K to last 4 st, k2tog, yo, K2.
2º buttonhole row: P across
Stockinette section
1º row: K1, sd, K to end.
2º row: P
Repeat these last 2 rows until the piece measures 6,5 (10 cm) in total, ending with a WS row.
Buttonhole row: K1, sd, K to last 4 st, k2tog, yo, K2.
Next row: P across
Keep repeating 1º and 2º rows, until the piece measures 14,5 (18) cm in total, ending with a WS row.
Armhole
Next row (RS): BO 2 (4) st purlwise, P to end.
Continue knitting in Stockinette stitch, decreasing on every odd row as before, until the piece measures 5 (7,5 cm) from the armhole, ending with a WS row.
There are 10 (13) st left.
Shoulder
Next row (RS): BO knitwise.
Enjoy the first video:
Baby Kimono knitting pattern Part 1
Sleeves
Ribbing
CO 24 (30) st and knit 2 (3) cm in broken Rib stitch:
1º row: *K1, P2*. Repeat from *to*, to end.
Repeat this only row until the piece measures 2 (3) cm, ending with a WS row (around 4 rows for the smaller size; 6 rows for the larger).
Stockinette section
1º and every odd row (RS): K across
2º and every even row: P across
Increases
Smaller size:
Increase 1 st at the beginning and the end of rows 3, 7, 11 and 15, as follows:
K2, inc, K to last 3 st, inc, K2.
There are 32 st left.
Larger size:
Increase 1 st at the beginning and the end of rows 5, 11, 15, 21, 25 and 31.
There are 42 st left.
After completing the increase rows, continue in Stockinette stitch (no more increases will be made), until the sleeve measures 11,5 (16,5) cm in total, ending with a WS row.
Next row: BO knitwise.
Knit the second sleeve, and we are almost done!
Before joining the Baby Kimono, I prefer to block every piece. This simple process will make your work much easier, and you can watch here to see how it’s done:
Seaming
Firstly, we’ll join the shoulders, then the sleeves, and finally, the sides. You’ll see in the next video how to do it using the method “invisible seams”.
Edge
Facing the RS of the kimono, and starting on the corner of the right front (the most exterior spot of the ribbing), pick up and knit 3 every 4 st (knit 3, skip 1), until the neckline at the back.
Then, pick up and knit 1 st of each “v” column of Stockinette stitch (1 st for every knit stitch we see): 13 st for the smaller size, 15 st for the larger one.
Continue working on the left front, picking up and knitting 3 every 4 st, until the other corner of the ribbing.
Turn the work (WS), and work 4 rows in Broken Rib stitch as before. BO working each st as it presents on row 5.
Sew up the buttons, weave in the ends, and your Baby Kimono is finished!
Enjoy the second video:
Baby Kimono knitting pattern Part 2
I hope yours looks fantastic!
Sayonara, and happy knitting 🙂
xoxo
Carolina – So Woolly
“As an Amazon Associate I earn from qualifying purchases.”