Puffy stitch knitting pattern: Versatile and rich in texture
In this tutorial, you’ll learn how to knit the Puffy stitch pattern: A fluffy, cozy stitch, which adds a lot of texture to the fabric. Because of its puffy look, it reminds me of the Fuchsia Flower stitch we practiced a while ago.
On one hand, the Puffy stitch is pretty versatile, it can be used to create a single motif, you can also work just a row of puff stitch amongst a Stockinette stitch, or knit all rows of the stitch to make a puffy stitch fabric.
It’s ideal for hats, blankets, or parts of a sweater/cardigan (like the sleeves, or the front/fronts).
On the other hand, it’s easier than it looks; it involves knitting and purling only.
However, today I’m revealing a little trick that will make the diamonds rise: When slipping the stitches, pull the working yarn a bit (give it a tug)… You’ll see why later 😉
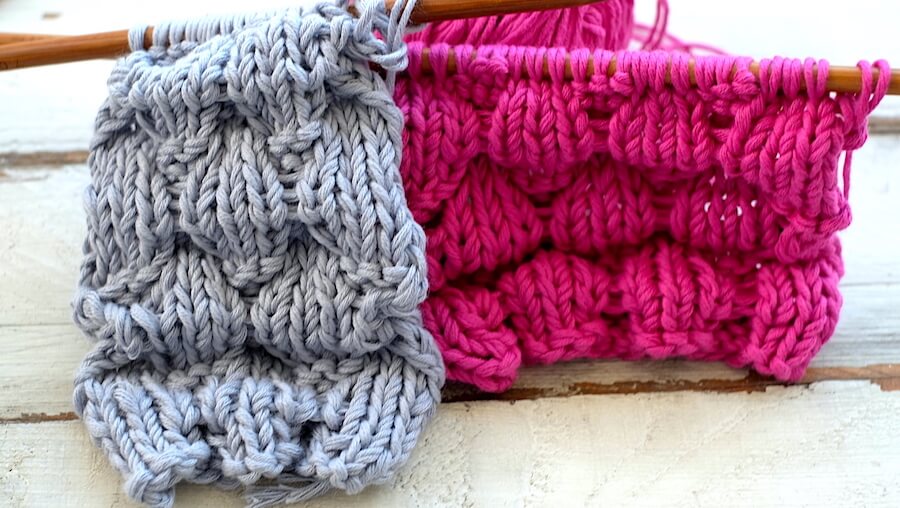
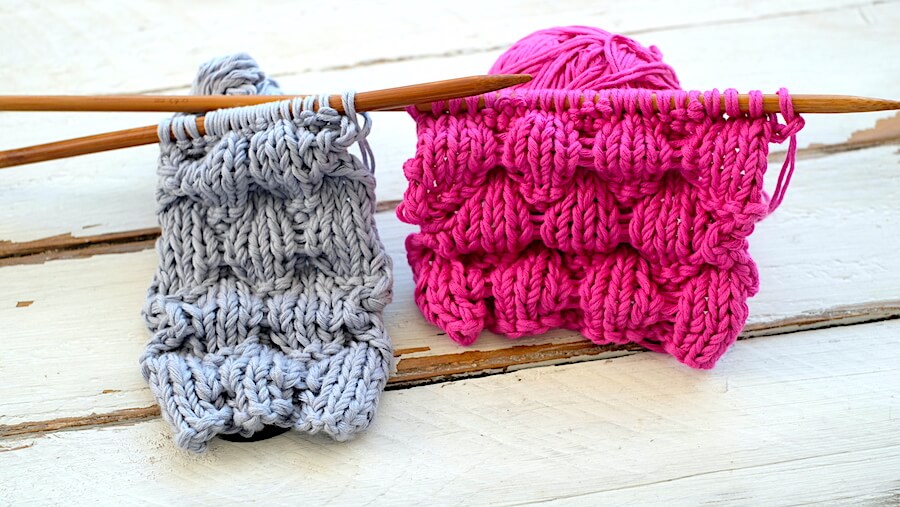
Finally, to create extra volume in your fabric, use a bulky yarn (wool or cotton), or use two strands of a finer yarn at a time, as shown in the pictures:

And I used one of my favorite bamboo knitting needles (US 11 / 8 mm).
Abbreviations
CO: Cast on
st: Stitch
RS: Right side of the work
K: Knit
P: Purl
sl: Slip
wyif: With yarn in front
wyib: With yarn in back
BO: Bind off
N.B.:
First of all, the selvedge stitches (first and last) will be knitted on odd rows and purled on even rows.
Secondly, the odd rows create the right side of the work.
In third place, the 3 stitches will be slipped purl-wise (as if to purl).
Last, but not least, the wider your swatch, the better the puffy effect will show!!
How to knit the Puffy stitch pattern
CO multiples of 6 + 3 + 2 (selvedge st); i.e.: 6 * 2 = 12 + 3 = 15 + 2 = 17 st.
1º and 7º rows: K1 (edge), *K3, P3*. Repeat from * to *, to last 4 st, K3, K1 (edge).
2º, 8º, and 10º rows: Work each st as it presents (knit the knits and purl the purls).
3º and 5º rows: K1 (edge), *K3, wyif sl 3 st*. Repeat from * to *, to last 4 st, K3, K1 (edge).
4º and 6º rows: P1 (edge), P3, *wiyib sl 3 st, P3*. Repeat from * to *, to last st, P1 (edge).
9º and 15º rows: K1 (edge), *P3, K3*. Repeat from * to *, to last 4 st, P3 st, K1 (edge).
11º and 13º rows: K1 (edge), *wyif sl 3 st, K3*. Repeat from * to *, to last 4 st, wyif sl 3 st, K1 (edge).
12º and 14º rows: P1 (edge), wiyib sl 3 st, *P3, wiyib sl 3 st*. Repeat from * to*, to last st, P1 (edge).
16º row: Work each st as it presents (knit the knits and purl the purls).
These 16 rows form the pattern, and will be repeated until the desired length is reached.
When finished, BO working each stitch as it presents, after a row 16.
Enjoy the video tutorial:
Puffy stitch knitting pattern
I hope you like it, and thanks for sharing!
Hugs, and happy knitting 🙂
xoxo
Carolina – So Woolly
“As an Amazon Associate I earn from qualifying purchases.”