3 Easy Steps for Knitting a Scarf -1 Row + Video
3 Easy Steps for Knitting a Scarf -1 Row + Video
Today, you’ll learn everything you need to know for knitting a scarf: the right stitch pattern, the best yarn, and measurements for a classic and also, a XXL scarf.
👉 Grab your Free PDF Guide
The 3-Step Perfect Scarf Formula: Knitting a Scarf Can Be Relaxing
When I was starting to knit, I had no idea about gauge; although I “followed” a pattern, the size wasn’t what I expected.
Besides, I didn’t know why my edges looked unattractive.
Nor why the scarf was “twisted”… there’s nothing worse than a curled scarf.
Or why one of the sides was ugly.
Not to mention that it could be all of the above and also itchy 🙁
You don’t have to make the same mistakes; knitting a scarf can be your first project, and it can turn out beautifully!
Watch the video tutorial below if you prefer to follow along step by step!
Easily enough, it all comes down to three things: the stitch, the yarn, and how many stitches to cast on.
1. Pick the Right Stitch Pattern
These are the key factors:
- A one-row repeat that’s reversible (it looks identical and pretty on both sides)
- That doesn’t curl (I’ve made 3 swatches using different yarns, and all of them lay flat)
- And looks pretty on the edges (there’s no need to add another stitch pattern on the sides and at the beginning + end of the piece).
Furthermore, if you can add simplicity to the equation, you’ll be a star!
That’s why I love this one: you only need 3 simple steps; after a couple of rows, your fingers will go on autopilot.
It’s rhythmical, quick to memorize, and very pleasant.
2. Choose Itch-Free Yarn (Super Important When Knitting a Scarf)
No matter how pretty your stitch is, if the yarn is scratchy, you wouldn’t give it away as a gift, not even wear it yourself!
Go for one of these if you can’t wear traditional wool yarn:
- Cashmere → ultra-soft and lightweight (to me, the most luxurious yarn in the world)
- Merino wool → super smooth, non-fuzzy, structured
- Wool + Silk blend → smooth, slightly shiny, and elegant
- Cotton or Bamboo blends → ideal for warmer weathers, vegan or allergy-friendly knitting
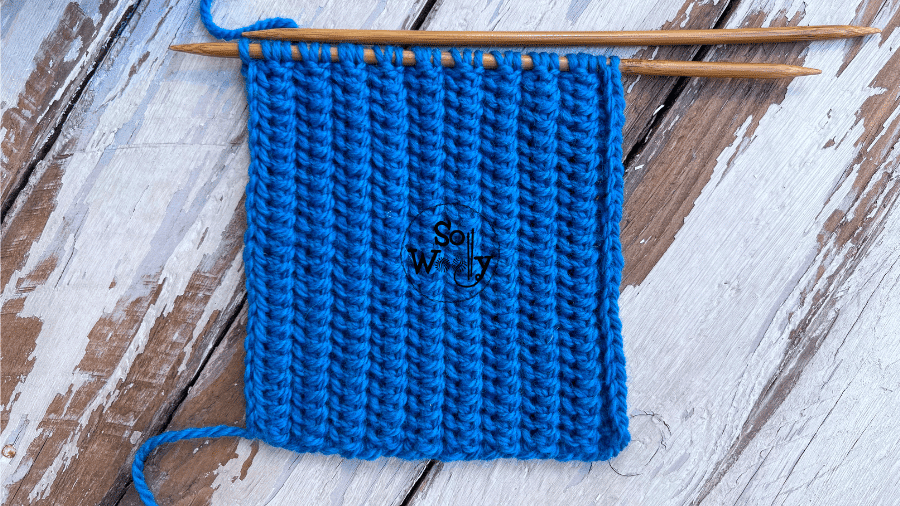
I made this swatch using 100% wool worsted weight yarn (nº 52) #ad
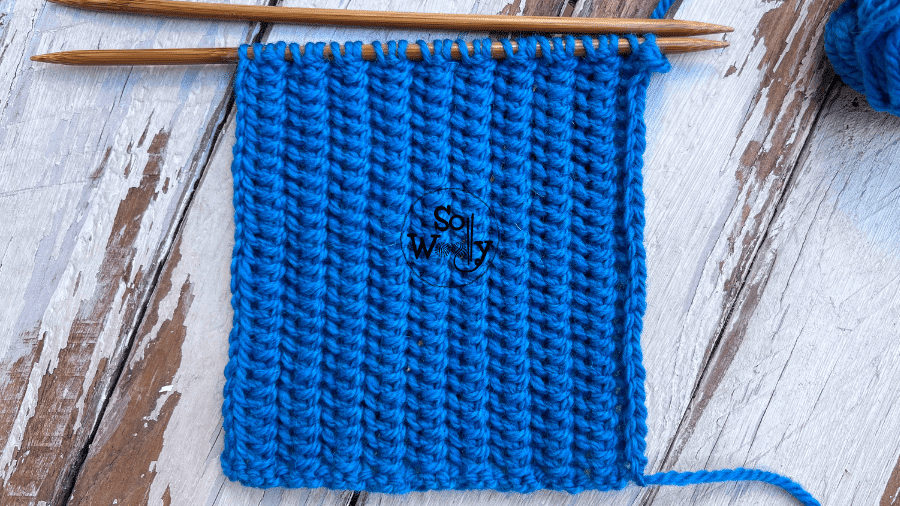
And one of my favorite wooden needles (smooth and pointy, perfect for this pattern) #ad
“As an Amazon Associate, I earn from qualifying purchases.”
3. How Many Stitches to Cast On 🧶
What I like the most of this stitch is that it works with any yarn or needle combo, but let’s start simple—worsted weight yarn and US 8 (5 mm) needles (beginner-friendly).
Measurements/Stitches for Knitting a Scarf: Classic & XXL
| Type | Width | Length | Yarn | Needles | Cast On (Worsted Weight Yarn) |
| Classic | 8 in / 20 cm | 60 in / 150 cm | Worsted | US 8 (5 mm) | 45 sts |
| XXL | 12 in / 30 cm | 80 in / 200 cm | Worsted | US 8 (5 mm) | 69 sts |
Yarn + Needle Chart for knitting a scarf using worsted weight yarn
The Trick for Perfect Edges
It’s as simple as slipping the first stitch purlwise with yarn in front, and knit the last stitch (or knit the last two together, as this pattern calls for).
That’s all (most of the stitch patterns allow us to do so).
You’ll get a nice chain-like border that looks smart on both sides.
This is the other side of the work:
👉 Grab your Free PDF Guide
A Simple Pattern For Knitting a Scarf
Materials
- Worsted weight yarn (about 310 g for a classic size / 620 gr. for XXL)
- US 8 (5 mm) knitting needles
- Darning needle for weaving in all ends, scissors, and measuring tape
Gauge
A 4 x 4 in (10 x 10 cm) square = 18 stitches. The row gauge isn’t important since you can knit and measure as you go 😉
Abbreviations
CO: Cast on
St: stitch
Sts: stitches
wyif: with yarn in front (keep the yarn at the front of the work)
sl1pw: slip one stitch purlwise (pass one stitch as if to purl onto the right-hand needle)
yo: yarn over
k2tog: knit two stitches together
wyib: with yarn in back (keep the yarn at the back of the work)
K: knit
psso: pass the first stitch (from right to left) over the last one
BO: Bind off
1-Row Repeat Reversible Knitting Pattern For Scarves
- Cast on loosely 45 (or 69 for XXL) sts.
- Row 1 (and every row): wyif sl1pw, yo, k2tog, *wyib sl1pw, yo, k2tog*. Repeat from * to *, to end.
- Repeat row 1 until you reach the desired length.
- When finished, BO knitwise. Cut the yarn leaving a nice tail, and pass it through the last st to secure.
- Block your scarf and weave in the ends for an amazing result!
Watch the Step By Step Tutorial: 3 Easy Steps For Knitting a Scarf
👉 Grab your Free PDF Guide
🎨 3 Ideas to Customize Your Scarf
- Try variegated yarns
- Add a fringe
- Work with two yarns of different shades at a time for a subtle marbled fabric!
💌 Join the So Woolly Family!
If you enjoyed this tutorial, join me for personal notes, thoughtful lessons, and calm knitting guidance — delivered straight to your inbox.
No overwhelm. No pressure. Just clarity and steady progress.
Hugs and happy knitting,
Carolina – So Woolly 💙
PS1: Searching for knitting a scarf with a reversible cable pattern? Click here